Conservation Journal
Autumn 2009 Issue 58 special edition
New mounts for the headless stone boy and his brother
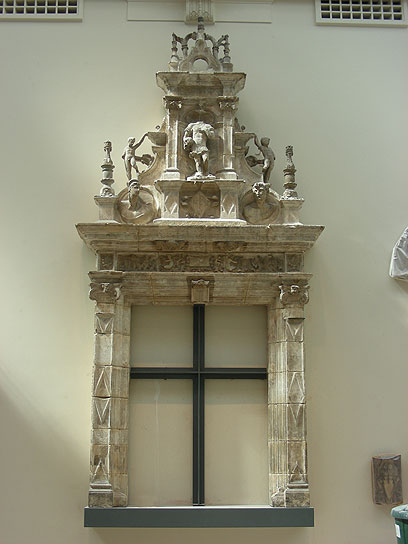
Figure 1. Dormer window (531-1905), after treatment (Photography by Lisa Wagner)
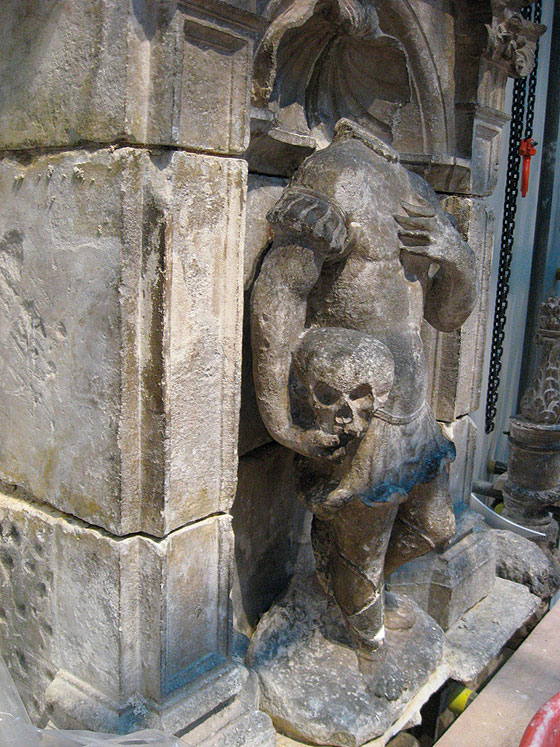
Figure 2. Headless stone figure during installation (Photography by Matthew Rose)
The re-installation of the sixteenth-century dormer window from Château de Montal (531-1905) (Figure 1), an imposing 8m tall and 3.5m wide exhibit, in the Paul and Jill Ruddock Gallery, The Renaissance City, required new mounts and fixing solutions. These were provided by the Museum's Technical Services, Design and Outsourcing mounts workshop.
Perched in a shallow niche atop the highest ledge of the Château window stands a headless stone figure just a metre tall (Figure 2). Under one arm he clutches a skull carried as nonchalantly as a football. Somehow he seems more curiously comical than macabre. Is that head he carries his own? The figure gestures close to his chest as much to answer, 'Oh, quite possibly'. His costume could almost be that of an ancient Roman with its skirt and puff sleeves. During the dismantling of the entire dormer window by the V&A Sculpture Conservation team in the summer of 2007, it became evident that the headless figure was separated from his feet. His dressy shin guards hid well the trauma of a clean break through his left ankle and the more shattered right shin and crumbled calf. The areas of loss had a concrete filler make-up. To prevent the figure toppling forward a simple 30cm bar bracket had been embedded in the lime mortar of the niche behind and fixed directly in a hole high between the shoulder blades. This was held with a pin through the hollow of the neck.
The size and condition of the existing hole did not offer a sufficiently strong point by which to secure the heavy statue; a new solution to support and secure this figure on his ledge was needed. In discussion with Lisa Wagner, Sculpture Conservator, it was established that the new mount should suspend the entire weight of the torso as the crumbled lower legs and the slanted nature of the break meant it was no longer appropriate for the feet to take any significant weight. To facilitate the process, it was suspended from a gantry in the Sculpture Conservation Studio and a design was devised for a substantial but discreet support harness that would suspend the weight of the torso from the back of his niche. The statue was transferred to the mounts workshops to better enable the fitting of the mount.
The design consisted of four prongs welded to a back support that ran the length of his spine, with steel bars of 15mm diameter hooked through the underarms taking the weight and preventing the forward tilt (Figure 3). Additional load bearing and stability would be provided by 6mm thick flat bars fitting beneath the hem of his dress at either side.
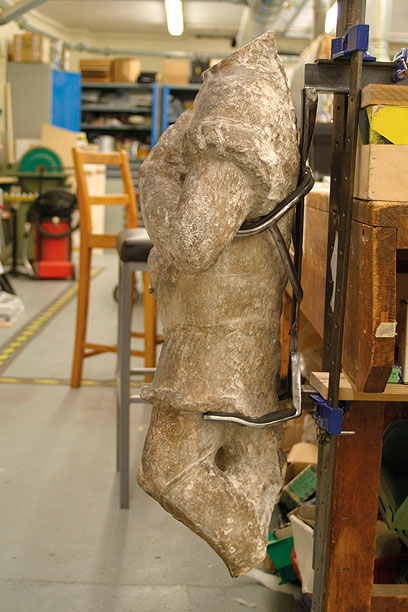
Figure 4. Trial run of mount for headless figure (Photography by John Dowling)
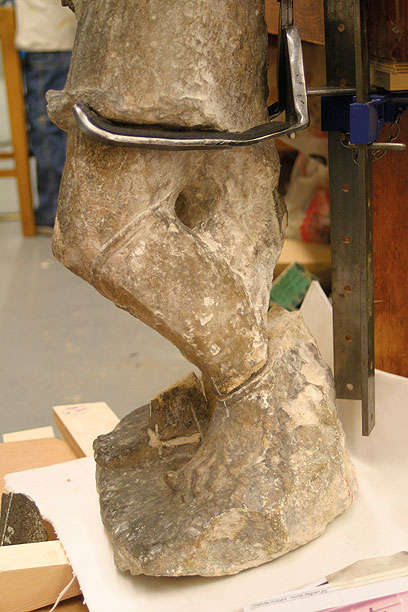
Figure 3. Detail of break across ankles and support offered by mount (Photography by John Dowling)
In total the mount consisted of 10 separate pieces of steel welded together. Each section of this mount was pre-cut, shaped, bent and fashioned to fit as much as possible prior to any welding taking place. From the outset, the most significant difficulty was to distribute the considerable weight equally on all four hooks of the harness and ensure the torso would balance suspended at the correct angle. The other difficulty was devising a way to anchor the harness securely into the niche. The solution was to weld two steel bars, at right angles, onto the back of the mount. These slot into the lime mortar joins between the blocks of stone. The distance between these bars corresponds exactly to the height of the principle block directly behind the figure. The flat bar at the bottom of the mount fitted between the two stones level with the hem of the dress. The top bar, a T-section, would rest on top of the stone, its tip against the wall. Onto that stone were placed two further blocks that sandwiched neatly either side of the T-section. As an additional safety measure, the tip of this bar was fitted with two long, threaded bolts to prevent the mount withdrawing itself from the cemented join.
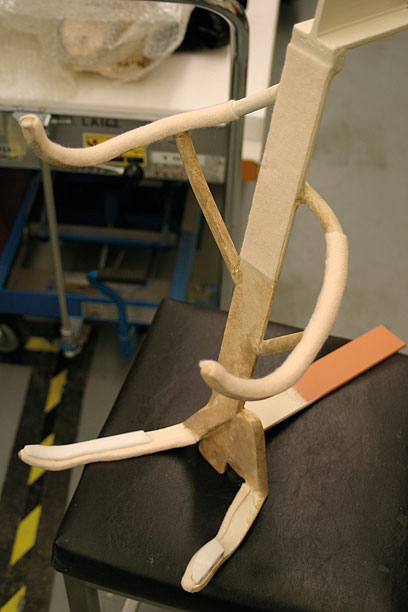
Figure 5. Finished mount for headless figure (Photography by John Dowling)
The welding of so many separate pieces at such a precise alignment was to prove the real challenge. Here the skills of John Dowling, Museum Technician, were invaluable in the construction of this mount. On completion, a test run prior to installation was staged in the workshops with the mount clamped to a bench (Figures 4 and 5) to demonstrate the effectiveness of its design. Once successful, the mount was undercoated with rust prevention, painted to blend in with the stone and Plastazote® padding added to load bearing areas (see Figure 3).
A mounts solution was also required for another Dormer window character, a stone boy clinging precariously like a monkey onto the far right side of the edifice. Unlike his twin, this statue had old breakage and cracks in the arm, his ankles and the support column jutting from his side. Two stabilizing support armatures were devised; one hooked under his armpit and gripped from the collar bone, another held from under the stump of his left elbow and then under his side support column (Figure 6). This mount was designed in pieces that could be assembled and bolted together around the figure in situ rather than a single-welded armature.
In February 2009, the window was finally installed in the Paul and Jill Ruddock Gallery (Figure 7). The separate section of the headless figure's feet was initially placed unfixed at the bottom of the niche before the figure was lifted into his support harness as the angle of the break prevented the feet being fitted after the figure. The feet were then tilted up to match the snapped limbs and, after correct alignment, lime mortared into position. When viewed from below, the end result is that the headless boy's mount is a quite unobtrusive feature of the exhibit. The other figure's distance from the wall meant his armature is visible from some angles. However, both these mounts were effective solutions for difficult statues. They also afforded a great opportunity for the V&A Mounts Making team to develop its metalwork skills and demonstrate the versatility of its in-house mounts production.
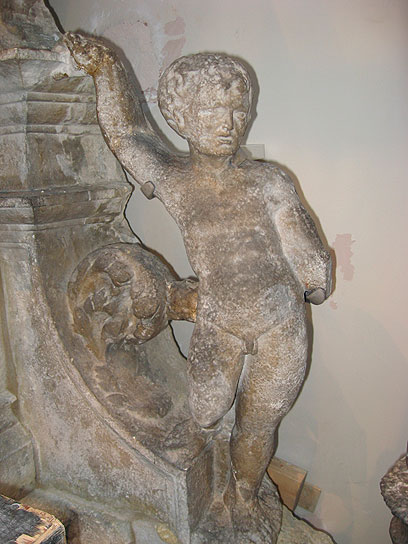
Figure 6. Stone figure on right of window during installation (Photography by Matthew Rose)
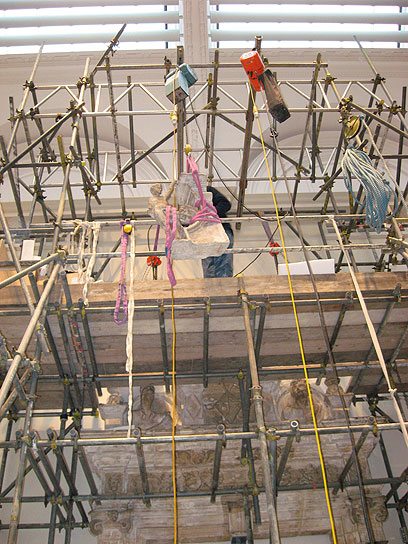
Figure 7. Installation of the dormer window, raising stone figure into position (Photography by Matthew Rose)
Autumn 2009 Issue 58 special edition
- Director's acknowledgement
- Editorial comment - Conservation Journal 58
- Designs on the future: Developing the new Medieval & Renaissance Galleries
- Aspects of the role of Lead Conservator
- Behind the scenes: Conservation and audience engagement
- Medieval & Renaissance Galleries: A passive approach to humidity control
- What's the difference? Climate comparisons for the Medieval & Renaissance Galleries
- A method statement for the Medieval & Renaissance Galleries
- Medieval & Renaissance Galleries conservation progress logs
- New mounts for the headless stone boy and his brother
- Sir Paul Pindar's house on the move again
- Loss compensation at the first floor interior panelling: Sir Paul Pindar's house front
- Training through collaboration - conservation of the Camaldolese Gradual
- A stucco relief by Francesco di Giorgio Martini: Conservation and technical considerations
- The Bourdichon Nativity: A masterpiece of light and colour
- Deteriorated enamelled objects: Past and present treatments
- Stained and painted glass from the Chapel of the Holy Blood, Bruges
- 'This burden of light is the work of virtue': Research on the Gloucester Candlestick
- Digital in-fills for a carpet
- Master Bertram's Apocalypse Triptych: To clean or not to clean
- Professional development in a project culture
- Work in progress: Holbein's drawing processes
- Conservation: Principles, Dilemmas, and Uncomfortable Truths - a summary
- Acknowledgements and Conservation Department staff photograph
- Conservation Department staff chart
- Editorial Board & Disclaimer
- Printer Friendly Version
- Work in progress: the development of the Medieval & Renaissance Galleries