Conservation Journal
April 1994 Issue 11
17th Century Chinese canopied bed
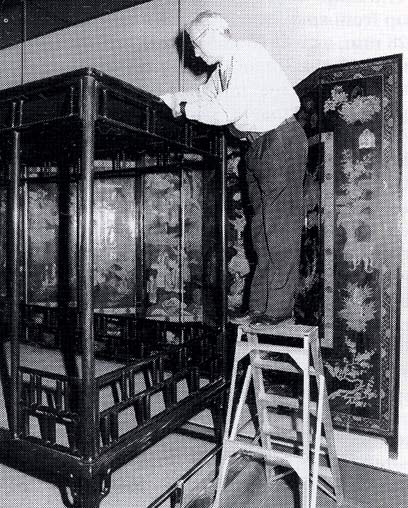
Examination of the bed (click image for larger version)
The patronage of Mr T T Tsui enabled the Museum to open the Tsui Gallery in June 1991. This Chinese gallery is arranged to display six themes; worshipping, burying, living, collecting, eating and drinking, and ruling. In 1987 I began conservation work on the 17th century Chinese canopied bed, (Museum no. FE 2 1987), which had just been acquired by the Museum and is now displayed in the 'living' section of the Tsui gallery. The bed is made from huali wood, which is probably equivalent to members of the Pterocarpus family of trees, which grow in the south of China, India, Burma and Sumatra. When in use the bed would have been hung with curtains and the sleeper lay transversely across the bed, not with the feet towards the opening. It measures 206 cm high by 128 cm deep.
Condition of object
On its arrival in the Museum the bed was in pieces. Careful examination revealed that it was in a fragile and unstable state due to woodworm damage, shrinkage and broken joints. During trial assembly of the bed it was found that five shaped apron pieces and one straight piece were missing. The rear stretcher rail was also missing. Each of the 17 sections which made up the bed had a yellow Customs' seal mark on it to denote that it had been exported legally from China (Fig 1). Masking tape, paper labels and mud were stuck to the various sections. The original surface finish of the bed is uncertain.
Bottom section structure
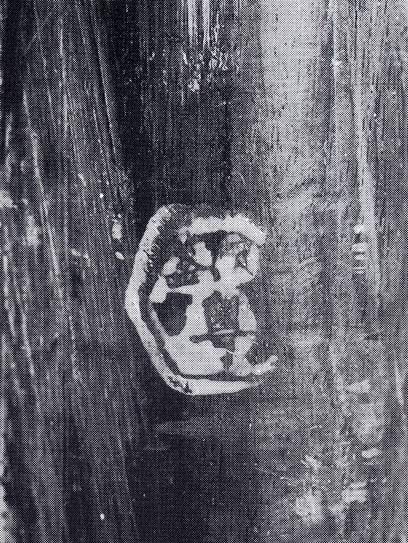
Fig. 1 Custom's seal mark (click image for larger version)
The bottom section of the bed is of fixed construction; that is to say, it is not meant to be taken apart. It consists of the main frame with the mitre joints together with their wedged double tenons (Fig 2). This frame takes the tension of the woven matting, used to support the occupants which has probably been rewoven several times during its history. It is fixed by tying through holes bored into the frame with a small retaining moulding fixed with iron nails. Originally this cover moulding would have been secured with wood or bamboo pegs.
There are two bracing rails on the underside, mortised and tenoned into this main frame, shaped to allow for movement of the woven matting support. There are also corner rails to brace the corners. The four legs are mortised and tenoned into the underside of the frame and pegged through the tenons. Four stretcher rails then connect the legs, also mortised and tenoned with pegs. Two muntins (vertical supports) at the front of the bed between the underside of the main frame and stretcher rail, are also mortised and tenoned with pegs. At the underside of the main frame the shaped and straight apron pieces are attached with bamboo pegs and mortised and tenoned into the legs and muntins.
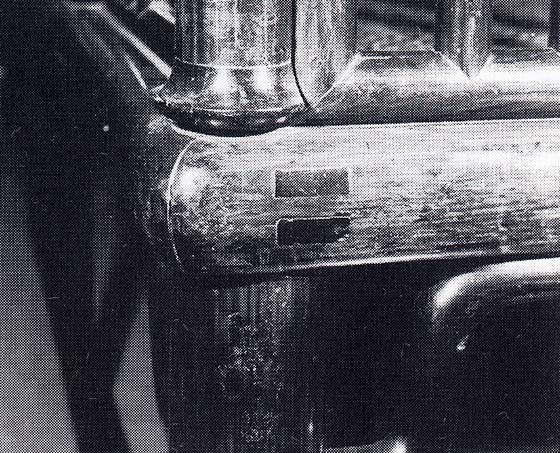
Fig. 2 Corner section of main frame showing mitre joint incorporating wedged double tenons in bed end (click image for larger version)
Above the bottom section of the bed are the lower balustrade sections mortised and tenoned together. These form two rows of plain double verticals and are arranged around the bed sitting on the main frame between the six posts, with loose tenons fitting them to the posts which are tenoned into the frame.
The upper balustrade sections are also mortised and tenoned together forming one row of plain double verticals. They are fitted into the top of the posts with a mortise and tenon/dovetail joint (Fig 3). The sections tenon into the mortises in the four corner posts then drop down into a dovetail joint. At the top of the two intermediate posts they locate onto a tenon, thereby locking the structure together. The whole of this structure above the bottom main frame and legs is a knock-down construction (ie: it can be taken apart).
Treatment
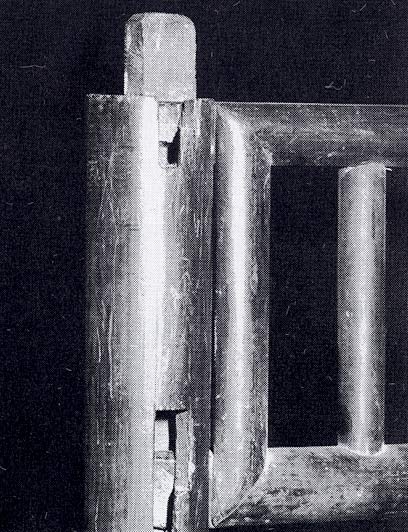
Fig. 3 Mortice and tenon dovetail joint in upper balustrade sections (click image for larger version)
When the bed arrived in the Furniture Studio, I vacuum-cleaned all parts with the exception of the tester (the top of the bed). The decision-making process for the conservation of the bottom section was reasonably straightforward. It was possible to copy all missing pieces from existing parts.
The shaped apron pieces had to be made up from small sections of timber 380 x 50 x 28 mm, as we did not have the required size to make the shape. The timber was cut on the circular saw, made smooth by hand plane, glued together with animal adhesive (Scotch glue) and cramped. When the glue had cured the cramps were removed and the timber planed to slightly oversize in thickness. The shape was drawn on, then cut to shape on a band saw. One end of these pieces had to have a tenon cut to fit into the mortise in the leg. This was made before too much shaping had been done as it was easier to hold them in the vice. Once the joints had been cut and fitted the final shaping was done by hand with a spokeshave and glasspaper to achieve a circular smooth section. A piece of huali wood was sent with the bed to make a replacement rear stretcher rail which was square in section. Tenons were cut and were fitted into the leg mortises before finally being shaped by hand into a round section.
As padauk wood when freshly cut is a very orange red colour, it had to be toned to match the finished huali wood. First the pieces were bleached using Ultra-bleach A and B. Ultra-Bleach A contains 2.5% w/w sodium hydroxide and Ultra-Bleach B contains hydrogen peroxide 27.5% w/w aqueous solution. Solution A was applied with a brush and after 5-10 minutes, wiped off with a rag in the direction of the wood grain. The solution B was then applied and left to dry, then washed with a weak solution of acetic acid and allowed to dry. Finally the surface was rubbed down with glasspaper. Shellac was then applied as a sealer, and lightly smoothed down with glasspaper. Shellac mixed with spirit green and spirit black was applied in subsequent coats, which were rubbed down between applications until the desired tone was reached.
Nitromors paint stripper (white spirit) was used to remove the yellow Customs' seal marks. Water and 'reviver' (linseed oil, IMS turpentine and vinegar) were used to clean most parts. There was evidence of a black substance on parts of the bed which could suggest it might have been very much darker all over.
Tester
Structure and condition
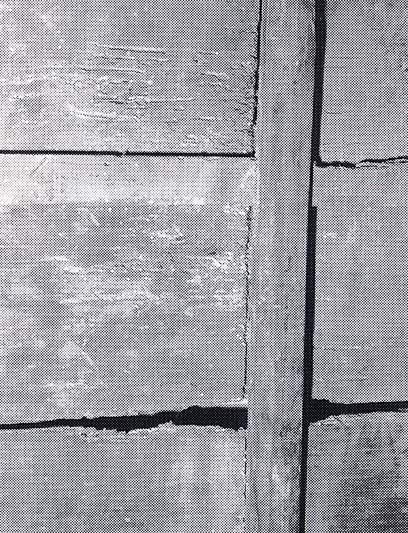
Fig. 4 Damage to tester (click image for larger version)
This tester was in a very fragile condition. It had suffered from exposure to a considerable quantity of moisture, extensive woodworm damage, shrinkage, and broken joints. (Fig. 4). The construction consists of three panels within a frame supported by three transverse bearers with connecting lath. The three panels are dowelled together with wooden pegs and dovetail housed onto the underside of the bearers, then located into grooves in the outside frame which is mitred with single mortise and tenon wedged joints at the corners. The bearers are mortised and tenoned into the outside frame and pegged. This is all dry construction i.e. without the use of adhesive. The yellow Customs' seal marks were not removed from the top of the tester. It was felt some evidence of legality was appropriate.
Treatment
The main decision for this part of the object was how to approach the consolidation of the woodworm damage in the panel of the tester. This had mainly occurred in the central panel at the centre of the tester, to such a degree that the dovetail housing joint no longer supported the panel to the bearer. After careful deliberation it was decided to consolidate with epoxy resin. Liquid epoxy resin MY778 containing reactive diluent, mixed with Hardener HY951 were used, both at low viscosity.
After taking the tester apart the areas around this joint were supported and held flat with pieces of wood covered with silicone release paper (to stop the epoxy resin adhering to the wooden supports) held into position with cramps. Himol 35 resin /hardener mix was used to stabilise the very fragile areas so that the panel could be worked on. This resin hardener mix remained fairly flexible which was an advantage whilst further work was carried out.
A template the size and shape of the dovetail on the underside of the bearer rail was made. It was coated with wax to stop the consolidant adhering to it and placed in position on the panel where the dovetail housing should be. This was then held firmly in position and the ends of this template were sealed with Plasticine to stop any consolidant escaping. Eight parts epoxy resin MY778 to one part of hardener HY951 were mixed and poured around this template to a level flush with the surface of the panel and allowed to cure.
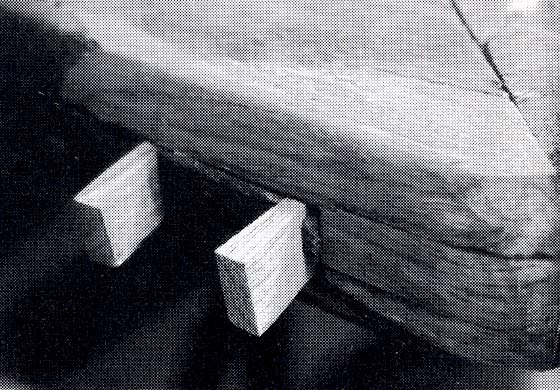
Fig. 5 Wedges cut and fitted to secure corner of frame (click image for larger version)
The next stage was to remove the template. A cut was made with a hand saw along the length and in the middle, to the depth of the template. This was done to help the removal, and by gently prizing these two pieces of wood they came away from the reformed housing. There were small areas of missing panel; these were filled in with pieces of huali wood and glued with epoxy resin AV100 and HV100. Some consolidation and reforming of the dovetail on the transverse bearers was done using epoxy resin.
When the consolidation treatment was completed and cleaned up, the panels were then fitted to the transverse bearers. Slithers (thin pieces of padauk wood) had to be fitted to some areas of the dovetail joint where a lot of shrinkage had occurred to enable the joint to be tight and secure. The panels and bearers were then fitted back to the outside frame. One corner of the frame had to have new pieces of wood spliced in to reform the corner and mortice. New wedges were cut and fitted to secure the corner (Fig. 5).
Completion
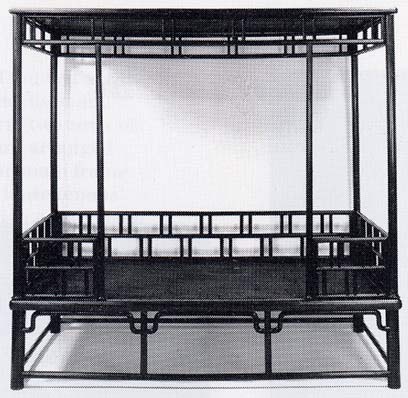
Fig. 6 Bed after conservation (click image for larger version)
Finally the whole bed was lightly wax-polished. All sections of the bed were taken to the gallery where it was assembled. The tester locates onto the tenons at the four corner posts and rests on the upper balustrade with loose tenons at intermediate points (Fig. 6).
Materials
Ultrableach
Nitromors
Epoxy resin MY778 + hardener HY 951
Himol 35 resin + hardener
Plasticine
Epoxy resin AV1001 + hardenerHV100
Mylands wax polish
John Bornhoft retired from the V&A on 17th February 1994, after 35 years at the Museum.
April 1994 Issue 11
- Editorial
- A saint unveiled
- 17th Century Chinese canopied bed
- Recording the changes: V&A conservation departmental archive
- The ageing & stabilisation of shellac varnish resin - an undergraduate research project at Imperial College
- Treatment of an early 18th Century Indian chintz qanat
- ICCROM - Japanese paper conservation course 1993: an introduction to the ancient skills of scroll mounting for the modern conservator
- Sand cast aluminium