Conservation Journal
July 1997 Issue 24
Managing to be 'Tackless'

Figure 1. The Denon chair (1803-1813), belonging to the National Museums and Galleries on Merseyside, complete with upholstery (click image for larger version)
The Denon chair (Figure 1) is one of a pair designed by Baron Dominique Vivant Denon and made by the celebrated firm of Jacob-Desmalter. The pair closely resemble a description of two chairs listed in the sale catalogue of Denon's collection after his death in 1827.
First documented in the 1917 sale catalogue of Deepdene, home of Thomas Hope, the pair were subsequently sold at Christies in November 1995. The Victoria and Albert Museum and the National Museums and Galleries on Merseyside each purchased a chair through the Objection to Export of Works of Art procedure.
The frame of the chair is mahogany with brass inlay and ormoulu mounts (Figure 2). There was no physical evidence of original or early upholstery. The only documentation relating to the original top covers was Denon's use of grey wool for furnishing the room in which his chairs were placed. No information about the chairs when owned by Hope has yet been discovered. A search of French sources has not revealed any comparable chairs with original upholstery.
The two museums agreed that the Liverpool chair would be upholstered first and a fine grey wool and matching braid was chosen for the top cover. Eventually it may be possible to identify the original top cover and trimming and the present materials can then be replaced.
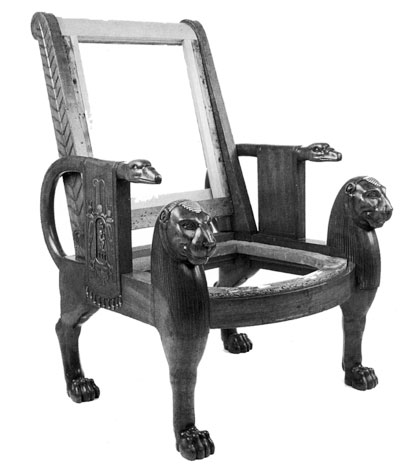
Figure 2. The chair with the upholstery removed (click image for larger version)
Conventional reupholstering generally involves attaching the various layers of materials to a wooden frame with upholstery tacks or staples, resulting in damage to the frame and loss of historic information. In the 1980s, in the USA, a method was developed that created the appearance of fixed upholstery, but without damaging the frame. Some treatments used a polyethylene foam Ethafoam (Dow Chemical Company) and polyester wadding, others a combination of Ethafoam and loose fillings such as horsehair. The term 'tackless' upholstery is often given to these methods. The aim of the treatment for these chairs was to re-create the upholstery using techniques and materials that were used at the time of manufacture, but based on the American idea.
The principles of this untacked reupholstery system are very simple. Secondary frames sit inside the existing framework. Metal plates are screwed to these frames and overlap the parts of the frame to which the original upholstery was tacked. The subsequent layers of upholstery are attached to this basic structure. Each unit is removable, leaving the chair void of upholstery for close examination.
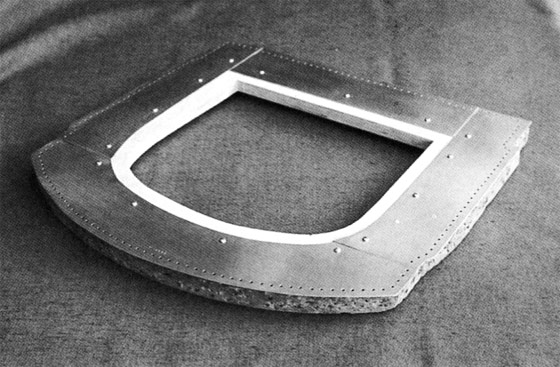
Figure 3. The drop-in seat with the secondary frame and metalwork complete and ready for the upholstery. Photography by Derek Balfour (click image for larger version)
Senior Furniture Conservator Tim Hayes made three secondary frames. One frame was required for the drop-in seat and one each for the inside and outside back upholstery. These were cut with a small allowance for movement from 17mm birch ply.
A simple technique was required for making the metal plates. For wide use and to reduce future corrosion problems, the aim was to avoid welding or soldering of elements and to use the most inert metal available, stainless steel. Avesta Sheffield, a major stainless steel manufacturer was contacted for advice. An austenitic stainless steel was selected (L316 grade), the prime constituents being iron, chromium, nickel, molybdenum and carbon. Obtaining the metal in small quantities proved difficult. The minimum order price is usually about £150 which buys 2 sheets 1m x 2m x 1mm.
Accurate templates are crucial. Melinex (Imperial Chemical Industries Ltd) and card were used for this from which the metal plates were cut using mechanical shears. The shapes were then finely adjusted with hand files. It was important to use clean tools to avoid contamination of the stainless steel (steel filings or wire wool would cause rusting).
The curved top of the inside back plate was formed using a raw hide mallet, tapered mandril and the flat of an anvil. Templates of the curve on the back of the chair were made using plastic coated 5mm electrical wire. With such curved pieces we found the lower edge of the plate had to be longer than originally anticpated, to give the finished frame enough clearance to hook over the chair carcass.
When the plates were completed they were date-stamped and attached to the secondary frame, using stainless steel screws to avoid galvanic corrosion. Holes, 2mm in diameter, were drilled at 10mm intervals at a constant10mm from the edge, to allow the textiles to be attached. Large holes meant fewer broken drill bits and made the stitching easier. The sharp edges were chamfered and each hole countersunk from both sides. Finally, the metal surfaces were cleaned using acetone (Figure 3).
The Upholstery
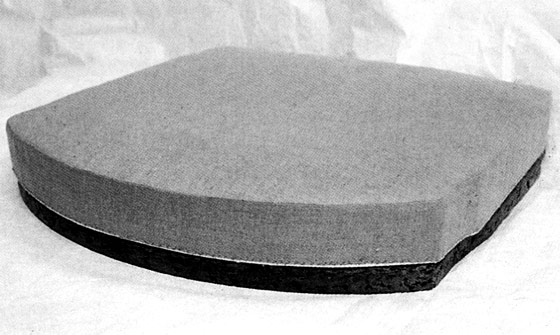
Figure 4. Completed under-upholstery awaiting the top cover. Photography by Derek Balfour (click image for larger version)
Before beginning to create the upholstery, the edge of the metal had cotton ticking folded over it and stitched in place, through the holes. Webbing and a linen base cloth were stapled to the secondary frame. A filling of curled horsehair was added and enclosed in scrim (an open woven linen). The scrim was turned under and pinned to the cotton ticking before being firmly stitched to the ticking.
To retain the seat profile three rows of twine stitches were formed through the stuffing. These pass from the side walls, through the stuffing, and out on to the top surface. A row of blanket stitch, along the top edge, was added to create a very sharp line to the final profile. A second stuffing of horsehair was added and the whole seat enclosed in fine linen, also stitched to the cotton ticking (Figure 4).
In order to retain the curve around the front of the seat, the top cover was made with a border. The underside was made in four sections. These form flaps that pass under the original drop-in seat frame and attach to the underside of the secondary frame with hook and loop fastenings Velcro (Selectus). The Velcro allows the cover to be released and the whole of the seat upholstery to be removed.
The basic principles and construction for the inside back are similar to the seat. However, the unit is attached by hooking it over the top rail of the chair. It simply hangs in place.
The outside back had to appear as a simple rectangle of fabric tacked flat to the frame; it does not have any filling. The same basic plywood and stainless steel unit was made to which the top cover fabric was stitched, adding the trimming around the edges. This unit is attached to the frame by four tabs of Velcro which are stapled to new frame sections (these were replaced before the chairs came to the Museum). The outside back is fitted into the chair before the inside back unit is in position.
Conclusions
Only minor adjustments were necessary to the original treatment proposal and it was possible to prevent the frame from sustaining additional damage. The chair appears to be conventionally upholstered, unless examined from the underside of the seat. The co-operation between the conservators and the curators was very productive and contributed greatly to the very successful result.
July 1997 Issue 24
- Editorial
- Managing to be 'Tackless'
- The Initial Conservation of an Archive of Rolled Architectural Drawings
- The Hand of God
- The Conservation of Nineteenth Century Dissected Puzzles
- Conservation and Mounting of Leaves from the Akbarnama
- The Coronation of the Virgin - a Technical Study
- Painting in Japan
- Printer Friendly Version