Some reflections from people who are using 3D for real now in museums. They are from two great pre-conference workshops at Museums and the Web 2013 in Portland.
As it stands right now there are a number of issues and service delivery challenges for managers looking to embed 3D features permanently into their museum services. Useable 3D technology exists in one form or another now, that can do amazing things that can be used to build great services, but some care is needed to scope this work.
What was clear from the discussions in these sessions was museum staff using 3D need to be strategic in their long term policy in order to build stable and sustainable platforms but also, to test the possibilities available right now, they will also have to make short-term tactical decisions on using unproven technology.
This is really because 3D is emerging and as such likely to be disruptive. It is however inevitably not possible to predict all the ways it will change people and social activity. It is risky to invest too much yet, but equally important to be playfully creative to tease out its real strengths for museums in small pilots and prototypes. Given it is not easy for any one organisation to do multiple test cases, sharing 3D practise will be important.
Summary
There are many elements to consider in 3D, both for what it theoretically offers and how that can be pragmatically delivered right now and in the immediate future. At the very least, the issues include: creation/capture, processing and manipulation, storage and archiving, presentation and interaction with users, and many other subtle aspects and sub-aspects.
Each of the various elements are at different levels of availaibility and/or development as a business or service tool. It is possible to build some things now, but there is no standard stable long-term solution for 3D yet, and it is unlikely to happen for some time.
Workshop #1
Using Web 3D for Exhibit Design, Promotion, and Installation
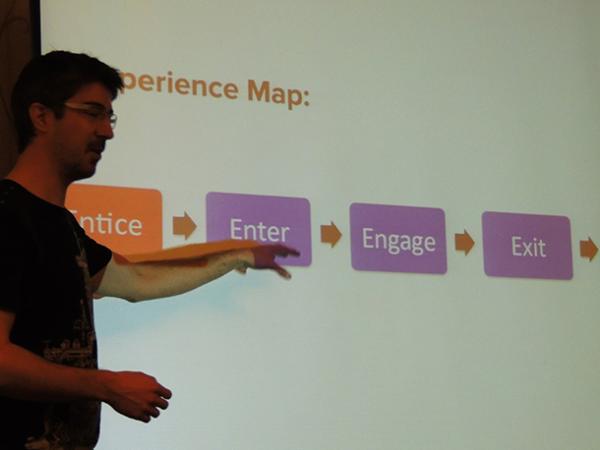
Simplified options for 3D display technologies
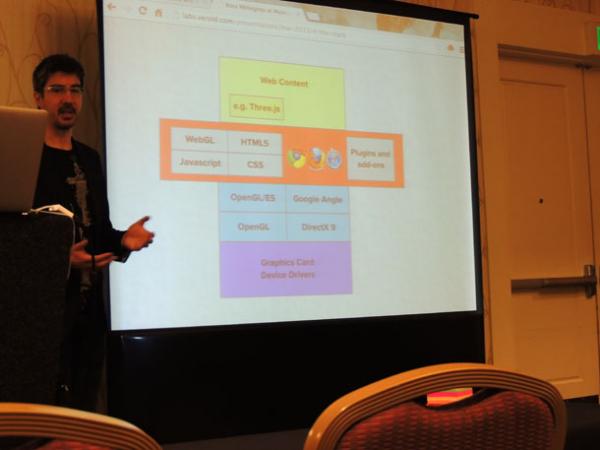
WebGL
Consider what platform you are investing
3D modelling for exhibition prototyping
Creating 3D models from physical objects using 123D Catch
Workshop #2
The Gallery in Your Hands: 3D Scanning & Printing

The MakerBot Replicator
This session was co-organised by Miriam Langer of New Mexico Highlands University and Liz Neely from the Art Institute of Chicago, Portland Art Museum’s Director of Education & Public Programs Michael Murawski and Kristin Bayans, Senior Educator at Oregon Museum of Science and Industry.
It was a great hands-on session showing how to produce 3D opbjects from real objects with easily accessible and relatively cheap technology.. It covered: using 123D Catch to get 3D models from objects (the practical end of what was discussed in the earlier workshop), using a Microsoft Kinect to scan in models using its in built infra-red, using Meshmaker to clean up scanned models, printing on the MakerBot Replicator and lots more.
The session raised a number of challenges that face practitioners, but the organisers held an admirably pioneering attitude of just getting stuck in and testing out the possibilities. Action learning as a means to understand technological possibility – fantastic!
Scanning objects using 123D Catch in practise

Michael Murawski, Director of Education & Public Programs leads attendees on a gallery object-scanning expedition in Portland Art Museum
One of three strands in the workshop was using 123D Catch for real. Armed with a simple, but effective checklist objects were scanned using 123D on iPhones and iPads.
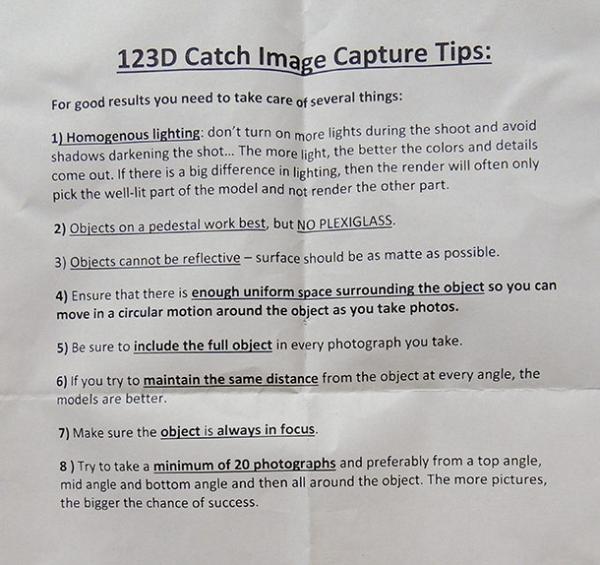
Simple checklist for happy scanning. Excuse the creases. It’s been used for real.
I scanned this wooden sculpture through its glass case and it is a good example of the things to consider in practise. You can see the reflections and glare of the case so it was interesting to see if the software could cope with that.
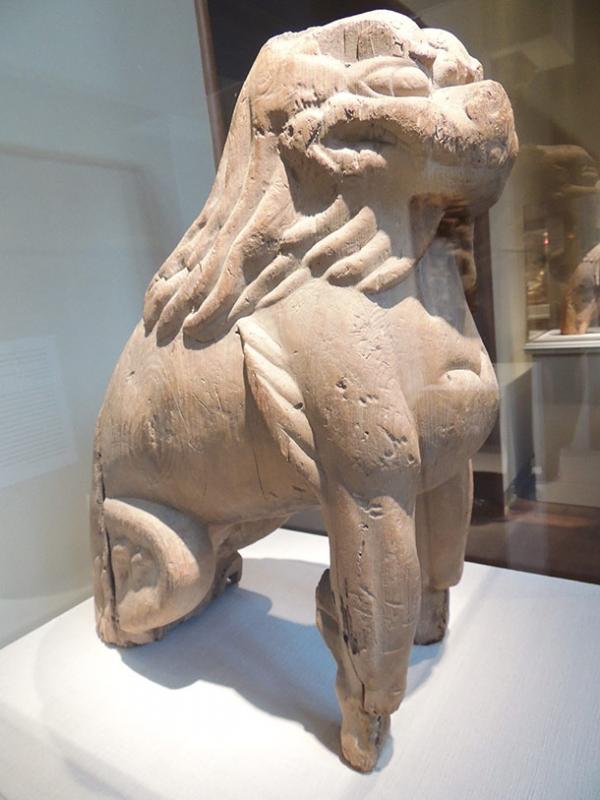
Carved wooden lion-dog type figure (in a glass case)
Below are three images of the 3D model created from this…
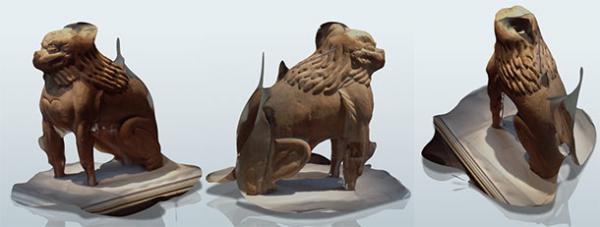
Three views of the 123D Catch generated 3D model – The full model can be viewed and the .obj file downloaded here: http://www.123dapp.com/FullPreview/Index.cfm/ID/1376642
The first thing to note is that the scanned model although not perfect, is surprisingly good, considering it was taken through a shiny case with no lighting control available.
I suspect that if asked many people would immediately say this scan is no good. I disagree.
It would clearly not be acceptable as a collection system master model. Even in this totally unedited state it could quite easily be useable as a 3d “snapshot”. For example it would be good enough to allow video conferenced discussion by conservators in different countries. It could also be imported in Google Sketch Up as it is as an object within a rough-draft exhibition design.
It is only by trying out these technologies that these possibilities become apparent, so PLAY!
Creating an object model mesh with a Kinect
The second strand of the workshop was scanning with a Kinect using the software ReconstructMe.

Mariano Ulibarri demonstrates using Kinect to scan an attendee
Microsoft’s Kinect is an awesome piece of technology. It’s Infrared sensors can be used to do depth of field scanning. Here a volunteer gets scanned. The office swivel chair is to allow her to revolve slowly in front of the Kinect!
The scans produced are not faultless, but just like those done with 123D Catch, they are very good for such simple and cheap kit. Happily both types can be cleaned up using free tools. Here is a scan of myself showing the problem areas. This is in MeshMixer.
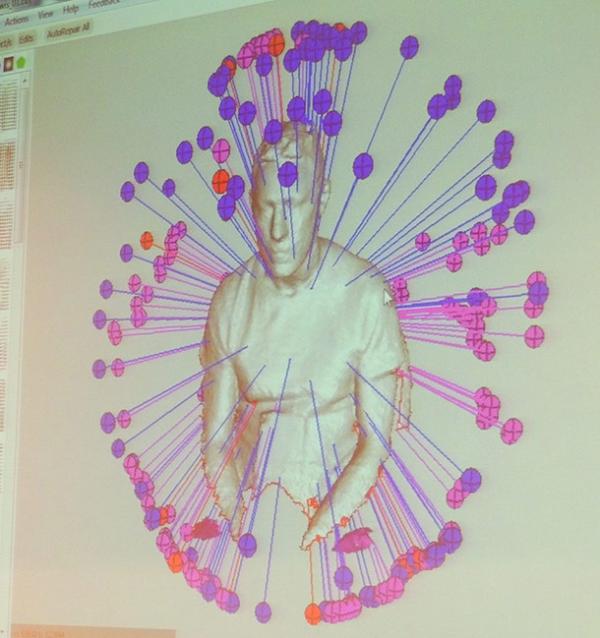
MeshMixer has built-in tools to help identify gaps in the mesh and can auto-fix these.
MeshMixer is also by AutodDesk and is free to download.
http://www.meshmixer.com/download.html
Printing using the AutoBot Replicator
The third strand of the workshop was using a 3D printer itself.
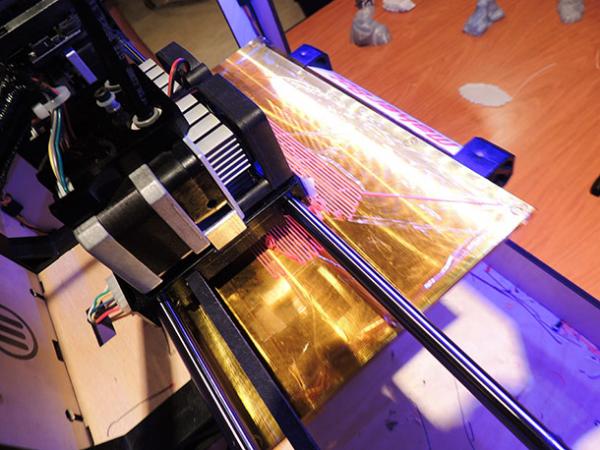
Printing the base layer of a 3D print on the AutoBot Replicator
The printing focus of the workshop looked at the popular MakerBot printer. This uses heated plastic as a raw printing medium and recreates objects from the mesh files by repeatedly plotting layers of hot liquid plastic on top of each other to form a matrix.
3D printing is a fairly tempremental process. It uses hot molten plastic and has to run for a long time during which it should not be left unattended.
Two common type of plastic were discussed.
ABS (Acrylonitrile butadiene styrene) a tough plastic similar to the material Lego is made from
PLA (Polylactic Acid) plastic made from plant materials and more environmentally friendly, but brittler and not suitable for robust models that may have to endure tension stress
The software that creates the print also has settings to create internal support struts, which are built up as a mesh of open buttresses.
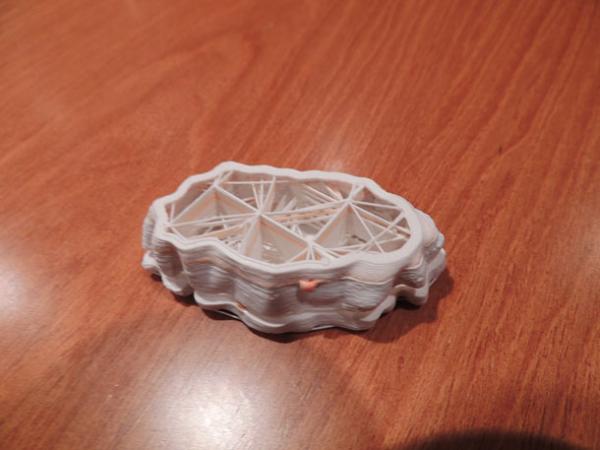
3D print cross-section showing internal strengthening mesh
Discussion
The workshop ended with a discussion of the implications for this entry-level technology. It was clear that people could see lots of potential for developing services, but that these might not be what you’d imagine. 3D modelling could be used for printing copies, sharing information, avoiding handling, creating conservation mounts, engaging via hands learning activities and many other things.
During the discussion the implications for copyright were also raised. If you can copy something in 3D, what does that mean? Lots of food for thought
Summary
This was a great workshop and a thorough practical introduction to what can be done at the current time with simple tools. These are not hi-resolution, high-end tools, but they still show the enormous possibilities of 3D which are just beginning to become easily attainable.
Coupled with the workshop on using web 3D above, this was an amazingly useful day.
Handy links
Verold – Ross’ company that offers WebGL services
http://studio.verold.com
123D – download various free 3D tools including Catch
http://www.123dapp.com/
ReconstructMe – the software used with the Kinect to get 3D models
MakerBot – the makers of the printer we usd
http://www.makerbot.com/
MeshMixer – for cleaning object models
AgiSoft PhotoScan
http://www.agisoft.ru/products/photoscan

All Pioneers spent a lot of time cleaning the mud and manure off their boots-such is 3D printing-every step is an advancement.
Hi. Yes I agree. You have to try this stuff to understand it. The really unexpected revelations of any technlogy come from understanding its characteristics without starting with a purpose or name in mind. A classic example of this is to ask someone what they can do with a brick. Most people will say build a house. But a brick is small rectangular cuboid with rough faces, possibly an indent, quite dense and made of a fairly weak bright orangey-red coloured material. These characteristics it also makes a great sanding block, doorstop, mallet, water-saver in a toilet cistern, paint pigment when ground etc. This is the same with 3D and any other tech. Study them and new facets emerge :)
How about a copy of the author in 3D? Here’s a scan of Andrew Lewis from the event: http://www.thingiverse.com/thing:78330