by Dr Nigel Bamforth, Senior Furniture Conservator, and Janna Mostert, Furniture Intern
In preparation for the ‘Plywood: Material of the Modern World’ exhibition at the Victoria & Albert Museum, the Furniture and Wood Conservation Studio treated an auxiliary aviation ‘drop’ tank, a supplementary fuel tank carried by aircraft, loaned by the de Havilland Aircraft Museum for display in the exhibition. Drop tanks were developed to extend the operational capacity of fighter aircraft and bombers. These were extensively employed by the RAF, the German Luftwaffe, the US Airforce and the Imperial Japanese Air Force during World War II.
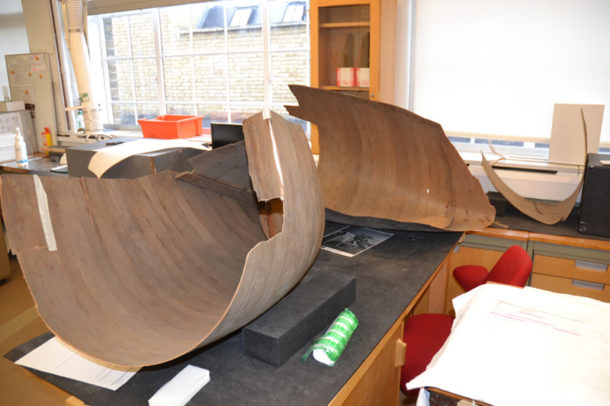
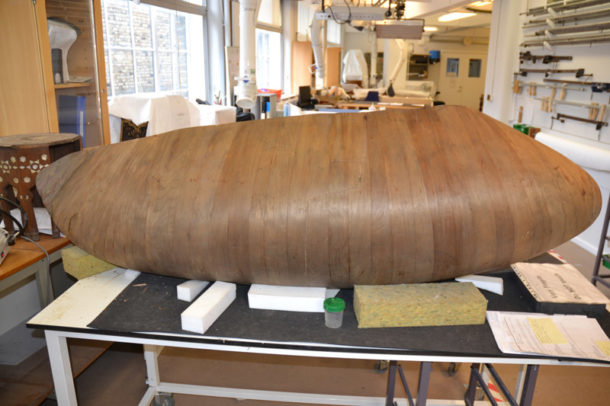
The de Havilland Mosquito drop tank is constructed of diagonal moulded plywood but many thousands were produced in papier-mâché. Not many of the drop tanks have survived and those that did were adapted after the war for other uses such as side cars for motorcycles and small racing cars, so it is rare to find an example that has not been refurbished. The drop tank, consisting of two large sections and four smaller sections, was in poor condition. It was warped, distorted and the body was fractured, with a major timber loss at the tail (Figure 1). The plywood surface was discoloured with general staining, accretions and surface dirt. Therefore, extensive conservation treatment was needed to enable the tank to be displayed.
Different combinations of backing materials and adhesives were tested on a 3mm birch plywood sample board to ascertain their stability for joining the sections and supporting the detached parts and fractures. Two different weights of Reemay (71gsm and 34gsm), a non-woven fabric made of 100% polyester, were tested in combination with animal glue in a traditional mix of two parts bone glue and one part hide glue. Solutions of 50% Paraloid B72 in acetone and 50% Paraloid B48 in 50/50 acetone and industrial methylated spirits were also tested on Reemay. All showed potential but the animal glue proved to have better adhesive properties and resistance against tension, and is easier to remove from the surface with warm water or a mild solvent. Linen, fully saturated with animal glue and adhered to the birch ply surface, was also tested. As linen is a woven material, it has more stretch and is less stable than the non-woven Reemay.
Nomex 410 (0.38mm), a calendered insulated paper, was tried in combination with Beva Tex, a non-woven polyester fabric coated on one side with Beva 371 film. The Beva sheet was ironed onto the surface with a hot spatula in order to melt the glue. After heating, the Nomex was ironed on top of the Beva and plywood. Nomex is a hard but flexible material that neither stretches nor rips. Since the object is curved and the fractured sections are warped and in some cases hard to align with the rest of the drop tank, the technique for applying the Beva and Nomex laminate could have been problematic so this was ruled out.
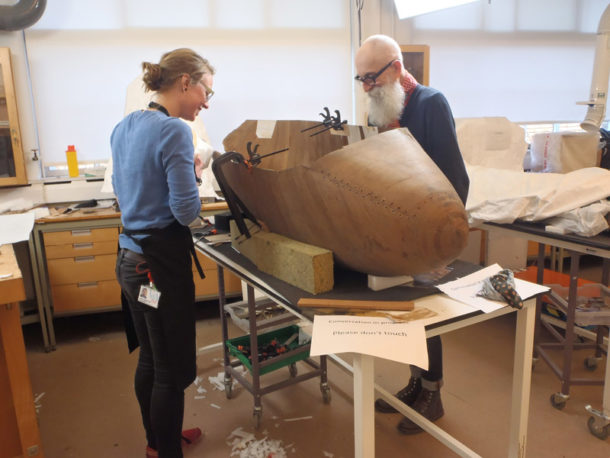
Reemay and animal glue proved to be the most effective combination of materials to use as a support for joining the plywood. The fractured sections were carefully aligned and held in position with lightweight deep-throated C clamps. The Reemay was cut to the required size, coated with animal glue and applied to the inside of the tank (Figure 2). Trigger clamps, weights and tape were used to keep the Reemay in contact with the wood surface while the adhesive dried. In areas with small wood losses, Reemay was stained with acrylic paint and adhered to the inside so that losses to the original plywood could still be seen while giving the impression that the object was complete. The tail was reconstructed for the same reason.
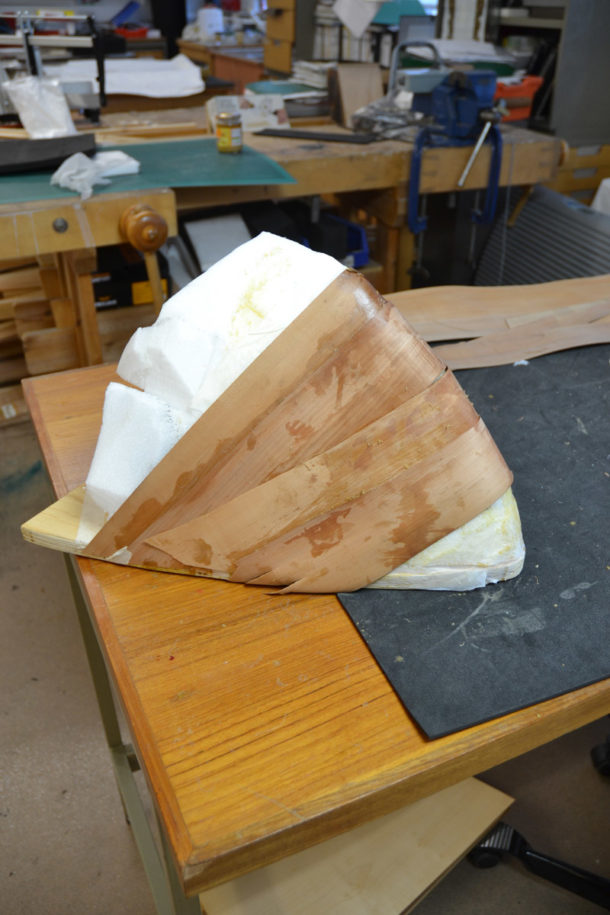
Cherrywood veneer (0.8mm thick) was used for the tail reconstruction. The build-up of plywood was replicated by applying three layers of veneer with the grain direction of each layer perpendicular to the last: cross-grained. A mould was made out of Plastazote foam, a high-density material with good carving properties. The mould was built up into the general shape of the tail then carved to an exact profile with a large knife. An MDF board was attached to the mould to serve as a base. The mould was then covered with a layer of packing paper and a barrier of Melinex film to prevent the veneer sticking to the mould. The first sections of veneer were laid in the mould following the direction of the original plywood drop tank (Figure 3). The second layer of veneer was laid over the first layer and again cut in sections to follow the correct profile, then the third and final layer was laid in the same direction as the first and adhered with cold set Canadian fish glue applied to the surface. The tail piece construction was held in place with kitchen foil and a self-adhesive bandage, which is ideal for use when adhering round curved materials as it has good stretch and will not tear. After the replacement section had dried it was taken off the mould and sanded, then trimmed to fit into the tail location within the original tank.
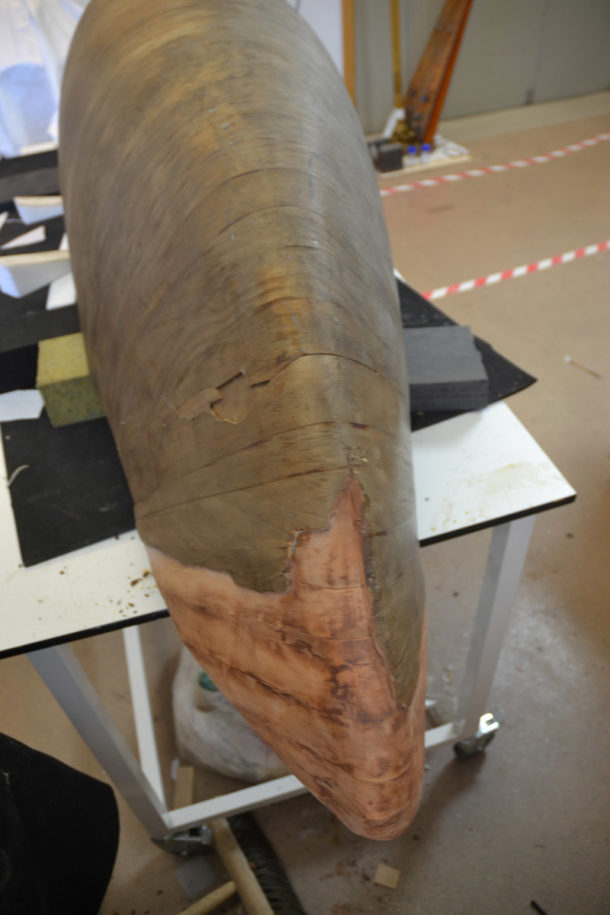
The tail reconstruction was attached to the body of the tank by placing a layer of Reemay on the inside of the tail to act as an barrier and to protect the original plywood, then the reconstruction was placed on the inside of the tail and glued in place with animal glue (Figure 4). The veneers were stained with watercolour wood stain and the original completed tank shell was surface cleaned with cotton wool swabs dampened in deionised water.
The tank is now stable enough to be displayed suspended from a steel support (Figure 5). Restored from a shattered shell, visitors to the exhibition can appreciate an unusual use of plywood and understand more of its potential.
Sponsored by MADE.COM. This is a free exhibition in The Porter Gallery and runs from 15 July through 12 November 2017.

The finished tank look lovely you two have made a wonderful job of it.My Uncle,worked at John Dickinsons,paper makers all of his working life,and he told me that they made “Drop tanks”out of paper during the war.
Only just seen this. I have an original drop tank from a Mosquito that was converted to a sidecar in 1946 by Watsonian Sidecars; very rare as the ply is thin and liable to cracking and damage.
My father worked at Shand Kydd the wallpaper manufacturer during the Second World War. As a teenager I was taken up to the factory in Highgate/Kentish Town to see the jettison tanks being made. I was fascinated and one of the workmen subsiquently made me a pencil box with a lid attatched by leather hinges and rivets. I still have this box and can send you a photo if you would like one.