The V&A has fashion collections which span hundreds of years! It tells us about how people have dressed from all over the world. You can look at examples here.
Fashion can be what we wear daily, like a school uniform or a favourite T-shirt or it can be something a bit special for a celebration or an occasion. It can used to represent who we are and the wider community we belong to.
We are going to create some shapes to make our own fashion silhouettes that can be worn. A silhouette is the overall shape of a garment. We are going to look at folds, drapes pleats and cones and investigate how these form basic fashion shapes.
Let’s look for inspiration…
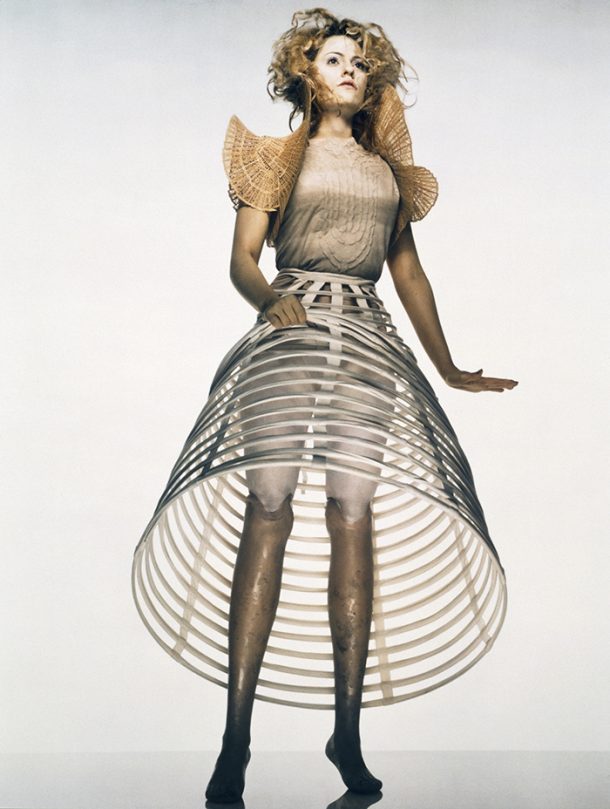
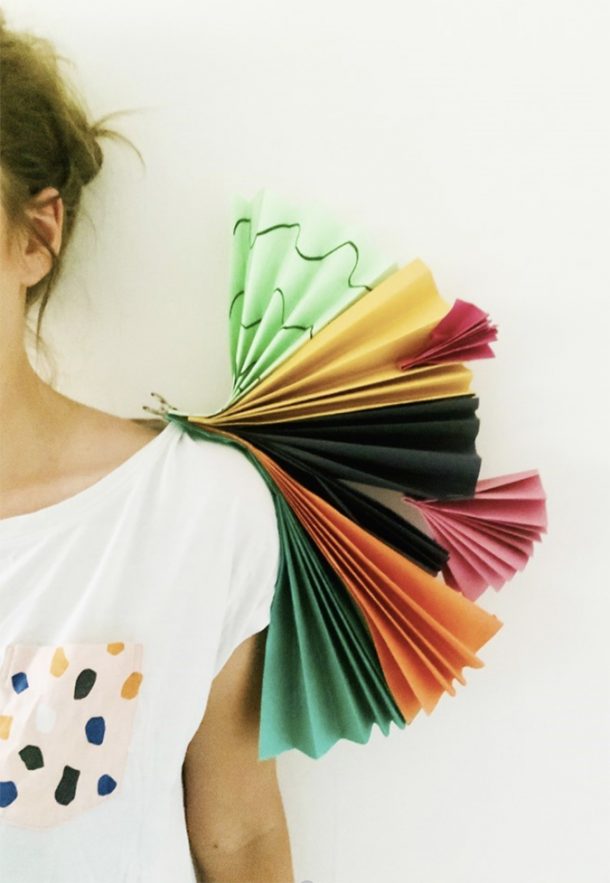
Below is an image of the athlete and model Aimee Mullins taken by the photographer Nick Night. Mullins wears a design by the late Alexander McQueen. Look closely at her shoulders, do you notice the exaggerated shapes which resemble fans? Move your eyes towards her skirt, it resembles a cone. It is based on a 19th-century undergarment called a crinoline which was worn under a skirt (petticoat) and made this very distinctive shape like a bell.
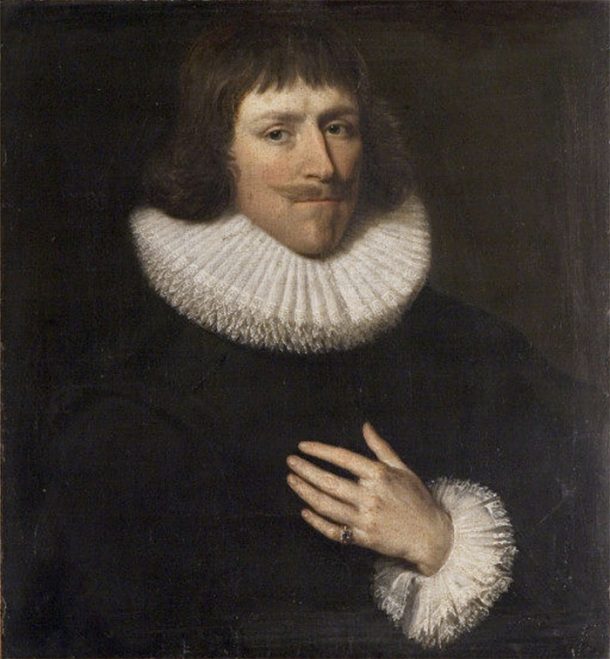
Now, let’s look at the portrait below of a man in the 17th century. He is wearing a ruff which was very fashionable during this time. A ruff was a frill worn round the neck which was pleated (a bit like figure eights) and very stiff to wear and forced you to keep your chin up! What shape does it remind you of? Do you notice the man is also wearing ruffs on his sleeves? These are smaller but also served the same purpose as the neck ruff in that they kept clothes clean.
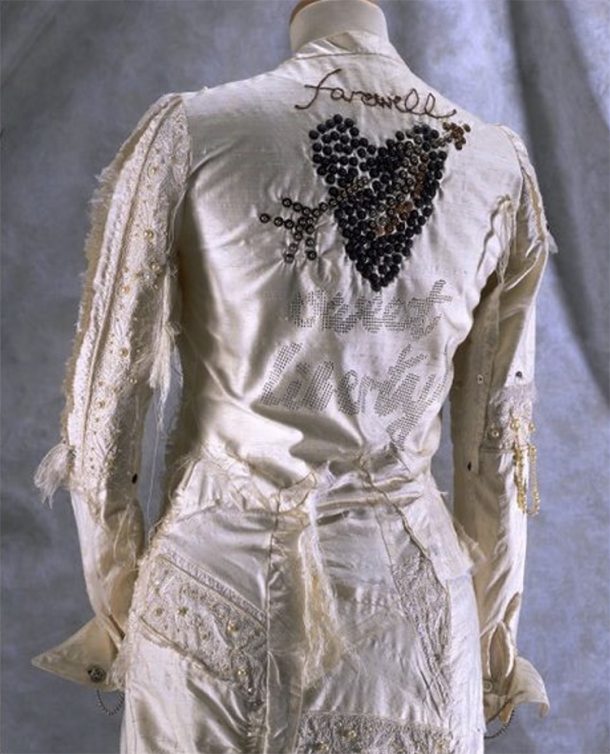
Below is a wedding dress by the late designer Joe Casely–Hayford. Can you see it says ‘Farewell Sweet Liberty’ on the back? This is because the bride would stand with her back to the audience and so people would see this detail. If you look carefully at the sleeves on the dress, you will notice they are folded, frayed and shredded at the edges. Look at what you are wearing today. How are the sleeves made? Do they fold up at the end? Do they have any specific details? Maybe a zip or buttons? Or ribbons or threads which make them special?
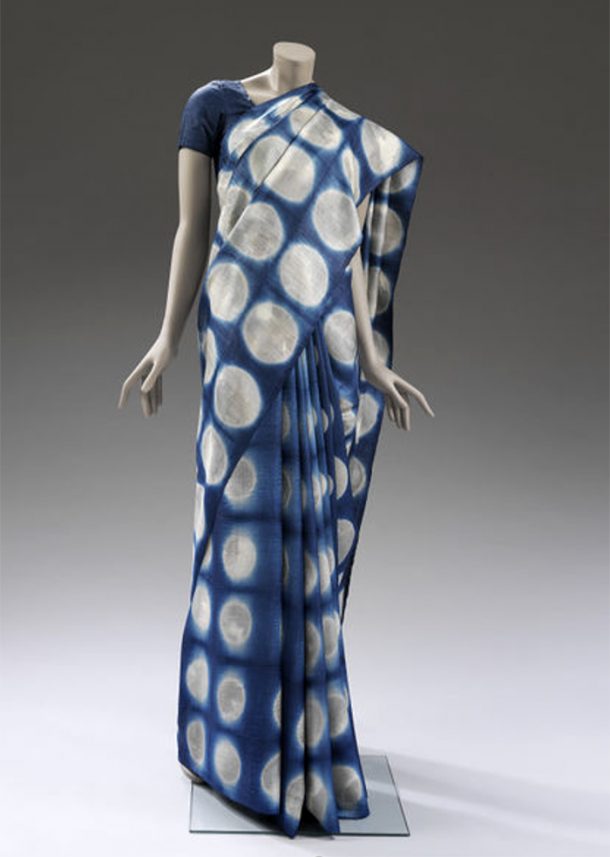
Let’s take a closer look at this sari. It is one piece of material draped and then fitted on the wearer. You can see how it folds at the front? This shape is called pleating and it can look a bit like a concertina. This sari was made by artists Aziz Khatri and the fashiondesigners Mriga Kapadiya and Amrit Kaur of NorBlack NorWhite. Aziz Khatri is based in Bhadli in the Kutch region of Gujarat in India. This sari was created by painting a piece of fabric with swirls of colour, then folding and compressing the fabric between two circular wooden discs which are clamped together and put into an indigo dye bath. Can you see the pattern resembles the moon?
Let’s make some fashion shapes
Try making some of these simple paper shapes. You will need some old clothes, paper, scissors, tape or a stapler and clothes pegs, paper clips or safety pins.
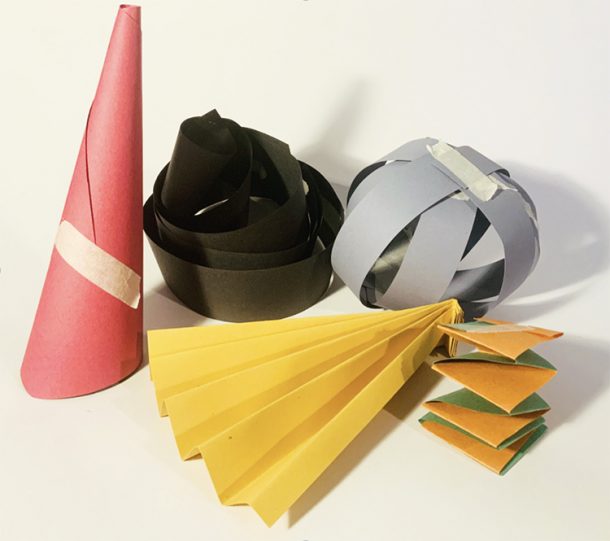
To create a cone: Roll a sheet of paper at an angle so there is point at one end. Attach the cone in place with tape or a stapler. Cut off any excess paper.
To create a concertina: Cut two long strips of paper. Attach at a right angle at one end with tape or a stapler. Fold the strips of paper, one over the other, again and again until you reach the end of both strips. If you would like a longer concertina, add further strips to the end. When you are happy with the length fix the strips together again with tape or a stapler. Gently pull the concertina to reveal the 3D-shape.
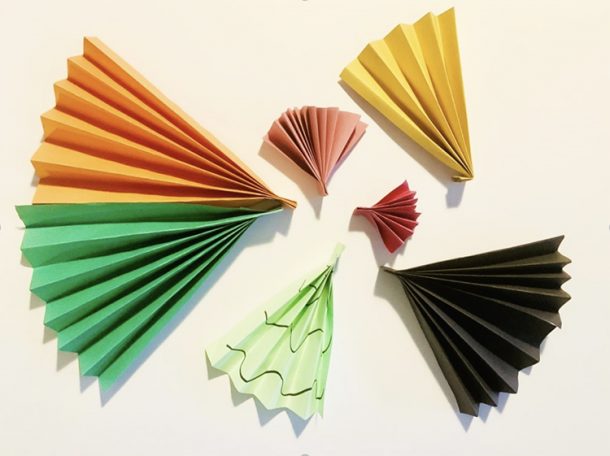
To create a Fan: Take a piece of paper and fold at one end – the width of the fold from the edge is up to you. Flip the paper over and fold again try, making the folds sharp by pressing down with your finger or a ruler. Repeat until you reach the end. Pinch the folds together at one end and attach in place with by making a tight fold, or with tape or a stapler.
To create a sphere: Cut multiple strips of paper. Use the strips to create a circle by attaching the ends together with tape or a stapler – you can make your circles bigger by cutting longer strips or attaching strips together. Using your first circle as a base, add additional circles of the same size around a central point to build a sphere, attaching in place with tape or a stapler.
To create a spiral: Cut a very long strip of paper or cut multiple strips and attach them together with tape or a stapler. Position your strip into a loose spiral. To fix your spiral in place and to give it some height, use tape or a stapler to build it up.
Now, you can make multiple versions of your favourite shapes These could be in different sizes and using different types of paper (plain paper, coloured paper, magazines, newspapers etc.)
Let’s make a fashion silhouette
Now use these structures to build a fashion silhouette. Try to make your silhouettes different in shape to the clothes you have in your wardrobe. Focus on the shape of your silhouettes, rather than the surface detail. You could make a whole outfit, just one item (hat, skirt, belt, necklace etc.) or just a fashion detail (shoulder pad, pocket etc.). Use clothes pegs, paper clips or safety pins to attach your structures to existing pieces of clothes – making sure you only use unwanted clothes for this activity and ask an adult for permission and help. You may need to attach some of your structures together with tape or a stapler.
Now put on a catwalk show for your friends, family or guardians. Watch videos of catwalk presentations by contemporary designers here.
Don’t forget to share images of your fashion designs with us on social media using #LetsMakeWednesdays
Thank you for this piece of research and the activity. It has reminded me of my art classes in school and college. This has sparked my creativity. I shall be making some of these to create innovate some of my hidden fashion ideas. And post them once completed.
Thank you so much.
All the best
Siobhan
V & A member.