As part of the V&A/RCA History of Design MA course, during the spring term students have the chance to explore early modern making techniques as a form of historical research through practice. With the support of V&A curators, conservators and tutors, students recreate early modern recipes to reflect on practices of making and the nature of artisan knowledge and skill.
The Thinking and Experiencing ‘Techne’ course is a satellite project of the ‘Making and Knowing’ project based at Columbia University, in New York, and this year was also a collaboration with the V&A’s Robert H. Smith Scholar in Residence, Dr. Spike Bucklow, from the Hamilton Kerr Institute. For more details on the workshops see News & Events at the RCA.
In this post, students Liddie Caston, Jessica Eddie, Ayelet Shats and Cara Robinson reflect on the experience of making a wooden furniture varnish from linseed oil with the added benefits of amber. The inclusion of amber allows the varnished finish to set and dry more quickly than a simple linseed oil finish. As less time was needed between applying different coats of varnish, this quickened the overall production of wooden furniture. Multiple layers of varnish also increased the protective finish and therefore quality of a piece of furniture:
The varnish recipe we followed from a sixteenth-century French manuscript now in the Bibliothèque Nationale in Paris is rudimentary with few precise details, such as temperatures, which you would expect in modern instructions. It states:
‘The Germans boil the minium intensely in linseed oil, and to give it the consistency of varnish, they mix in heavily pulverized amber’.
We approached the process in three distinct stages: preparing the amber, heating the linseed oil and melting the amber, and finally combining the linseed oil and amber.
Preparation of the Amber
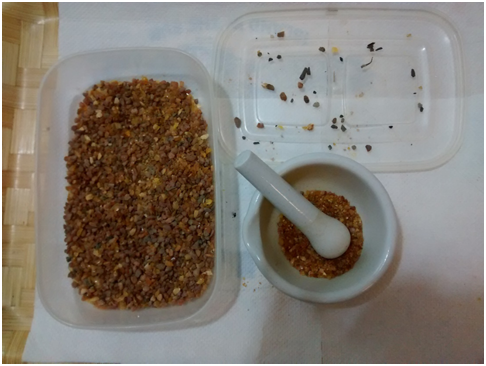
The amber had to be finely ground so that it was easier to melt and combine with the linseed oil. Although not a feature of the original recipe, we prioritised health and safety and wore goggles and protective masks to avoid breathing in the fine dust. Grinding the amber produces a very sweet treacly aroma, a reminder of amber’s origins as a sticky tree sap before crystallisation. When you see amber in its raw state it is obvious why it was chosen as a finish to enhance and protect wood, as it is hard yet translucent and golden in colour.
Heating the Linseed Oil
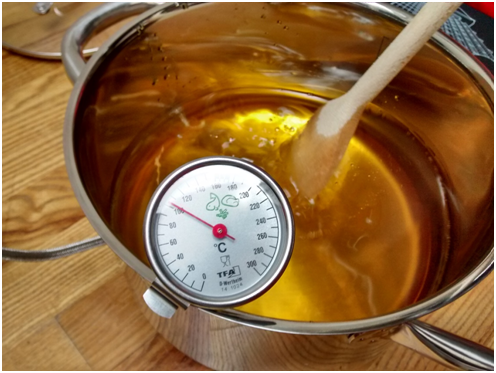
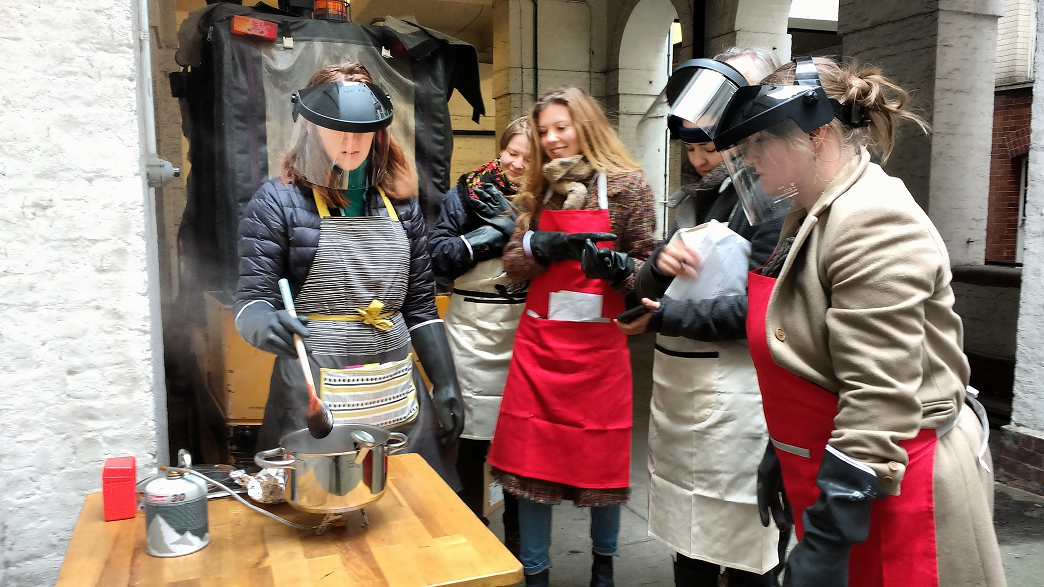
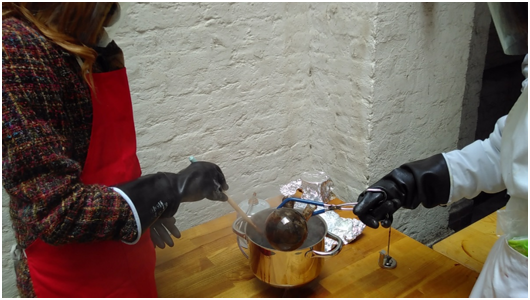
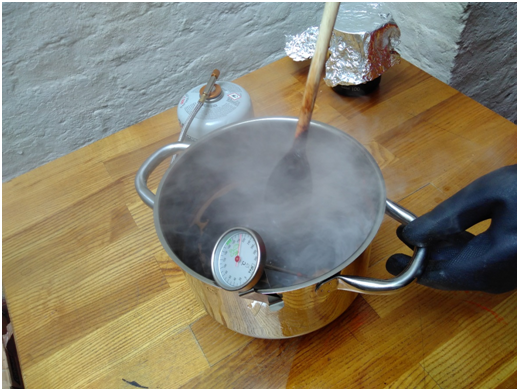
We had to heat the linseed oil as well as the amber, so the two could be combined without cooling. As we were using a small camping burner, the linseed oil was stirred gently at regular intervals to encourage even heating and later a loose tin foil jacket was placed on top to maintain a steady temperature. As the oil heated up past 100 °C, it became slightly thicker and gave off a rich diesel or citrus aroma that became unbearable to be next to for long periods of time at 200 °C. After 72 minutes the oil reached 200 °C and at this point we added lead minium, as instructed in the recipe. Minium is a bright, orange-coloured powder added to help bond with the amber. This turned the mixture to a vivid shade of orange.

Senior V&A furniture conservator Dr Nigel Bamforth adding the lead minium to the linseed oil
Melting the Amber
Having spent the previous week grinding the amber down to a fine powder, we were particularly keen to melt the amber correctly, especially as we knew that students last year had encountered challenges at the grinding and melting stages. As the melting point of amber is high, we used the modern day equivalent of a white hot flame: a scientific heating mantle with a round bottom flask to melt the powdered amber. Using a transparent glass flask also allowed us to see what was happening to the mixture.
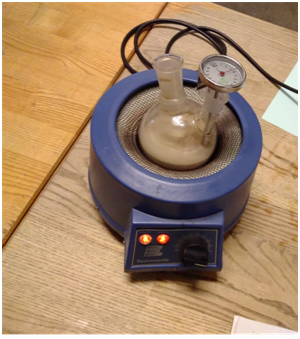
During the melting process, the amber became a very dark colour and highly sticky, which made us concerned that the mixture had been ruined and would be unsuitable to use. We relied very much on our senses of smell, sight and touch (via the thermometer) to assess the melted amber. At times the mixture was grainy and so stirring at regular periods helped break the grains down whilst we remained careful not to let the mixture cool. As with the linseed oil, we put a foil cover over the top of the flask to ensure even heating. As the mixture fully became liquid and reached 300 °C it began to smell so strongly that anyone close to it had to wear a mask. Overall the amber took 64 minutes to reduce to a liquid suitable to combine with the linseed oil.
Combining the Linseed Oil and Amber
Gently stirring the linseed oil as the melted amber was added
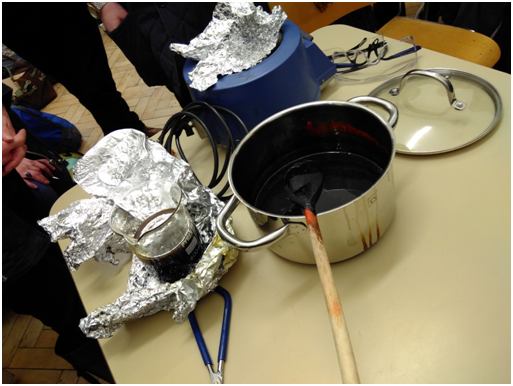
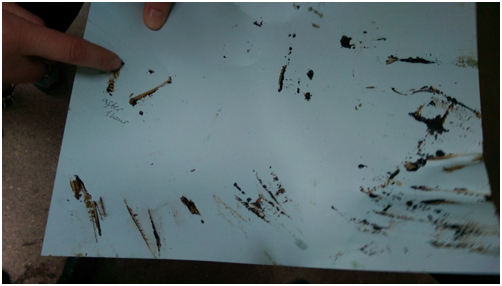
When held to the light the mixture seemed to have dark impurities, which could have been in the ground amber or where some of the amber had burnt in the round bottomed flask. However, the mixture could be filtered to remove these (we were advised that white bread would also filter this well if we wanted to remain in keeping with the period of the recipe). The final mixture looked very dark in colour and so we were curious to see how it would appear on wood – a point for discussion in our next blog post.
The concept of techne relies heavily on the use of previous or tacit knowledge of a process or materials and we found this to be very relevant with this experiment. As the recipe text did not include much detail, we often depended on our senses and intuition (as well as expert advice) to ensure the process was working. We would like to thank Dana Melchar (Senior Furniture Conservator, V&A), Dr Nigel Bamforth (Senior Furniture Conservator, V&A), Nick Humphrey (Curator of Furniture 1400-1700, V&A), Dr Spike Bucklow (Robert H. Smith scholar in Residence, from the Hamilton Kerr Institute) and Dr Simona Valeriani (Acting Head of History of Design, V&A) for their enthusiasm and expertise during this lab class.
To see what else V&A/RCA History of Design students have been up to, check our pages on the V&A and RCA websites and take a look at Un-Making Things, a student-run online platform for all things design history and material culture.

That amber is burnt, and not proper for a varnish. The method above, is not how the old masters made amber varnish. There are tried and true techniques, but generally none of them are followed. Amber varnish is dark, but there are ways to make it, so that it is strawberry red in color, and very transparent.
Hello there! really fascinating to hear your experience. Would love to talk to you and learn more!
Hello, I am a violin maker and have been making varnish with linseed oil and and rosin for years. It seems to me that you might have made varnish, it just looks lost in that black goo on the wooden spoon and beaker. I have wondered about adding amber to my varnish mix and found your post. If you have figured this out, I would like an update. My email is above. If not I might be able to help you with a path to success.
Hi Charles, thank you so much for your comment. It would be lovely to have a chat about your working methods and compare our experiences. Ours was an experimental teaching workshop and we could certainly learn from your long experience. Please do drop me a line on s.valeriani@vam.ac.uk.
Charles Conti – it’s several years on now. I’ve made a few batches of amber varnish at 1/2 resin to 1 oil or so, maybe slightly more biased toward the resin. it will always be dark, but it can be lengthened with oil to be less dark.
However, I have generally had to run mine at about 700F to get a good varnish, with a lot of patience. You may wish to try a part rosin and part amber varnish, but my suggestion would be to do it in a closed pot in a very safe area, and for example, if halving the resins with each other, the colophony will collapse into a liquid quickly and then that liquid must be heated high end to run the amber. If you are starting with baltic amber in small chips like this (I do also), that temperature may be a little below 700F, but it will be very easy to run it less than that and end up with a lot of amber in the bottom of the pot that hasn’t run.
https://i.imgur.com/sdoSjlV.jpg
here is my varnish on chakte viga handled chisels that I’ve made. The varnish is deep in color and has a reddish tone that is great with woods that already have a reddish bias as well as darker woods where the red won’t become too pronounced.
Use much care, though – the temperatures needed really require close monitoring. I have heard of fused amber being sold, but have never bought it. Another maker told me that it is very pleasant to work with and doesn’t have the dicey temperature threshold of the resin that has not yet been run.
They did well here to come up with a varnish that isn’t just gooey ash – it’s dark, but it’s difficult to do a straight varnish in amber and get it to run without burning it. I typically use about 2 parts rosin to 10 parts amber. The rosin helps to get the bottom layer of the amber started, but I don’t know how much of it remains once the temperatures go up. I want to use it for furniture varnish (and possibly guitars), so the idea of getting the fused resin is really not economically sensible.
I am so glad to read that about making amber varnish for violin.
I am amazed that the amber could be melt in boiling!
Thankyou!
Can you help me