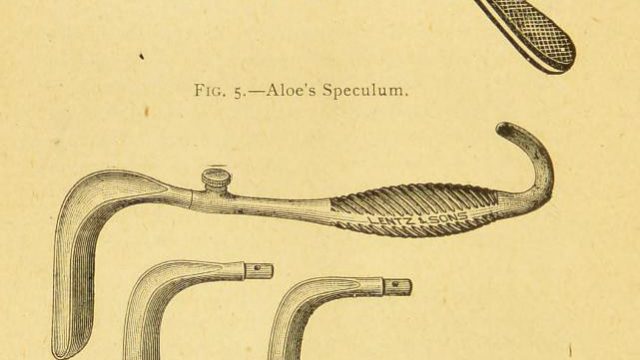
The GynePunk 3D-printed speculum is a piece of speculative design, not to be used but to show what could be possible with 3D printing. Speculative design is a method to address societal problems and test ideas for the future by creating products and services for potential scenarios. The GynePunk 3D-printed speculum is speculative – its purpose is solely to aid us in imagining a world in which everyone could have access to safe and respectful gynaecological healthcare.
The files to print the GynePunk speculum are open source, meaning that they are freely available on the internet and easily redistributed. In theory, the design is ‘accessible’ to anyone with access to the internet. However, how feasible is it to use 3D printing to produce medical equipment such as a speculum in the present moment?
The GynePunk speculum being open-source speaks to ideas about accessing tools outside their traditional settings, such as a hospital. But access to the speculum itself depends upon the availability of materials, space, skills, financial support and much more. The 3D-printed parts need to be affordable, biocompatible and easy to manufacture. Without these resources, access to the tool and its safe usage is restricted.
Fused Deposition Modelling (FDM) is the most common form of 3D printing and was used to create the V&A’s GynePunk 3D-printed speculum. To explore its design, I printed my own version using FDM printing, as well as printing the speculum through another method of Stereolithography Apparatus (SLA) so that I could compare techniques and see what is revealed when different materials, processes and printers are available – and what this can highlight about making a medical device ‘accessible’. I aimed to question the idea of access through what is or is not possible under certain circumstances.
I printed my two versions of the GynePunk speculum in my university’s laboratory. The digital files needed to print the design were accessed through thingiverse.com, where it was downloaded in STL file format, which is widely used for rapid prototyping and 3D printing. The models were processed using the software Ultimaker Cura and printed using my university department’s FDM and SLA printers.
3D printing, also called additive manufacturing, is the construction of a 3D model from a 3D digital model. FDM, also called Fused Filament Fabrication (FFF), is an additive manufacturing process where a strand of material, usually the thermoplastic polylactic acid (PLA), is deposited layer by layer to create a 3D structure. During the print process, the plastic filament is fed through a hot extruder which melts the plastic so that it can be extruded by the nozzle at the tip of the print head and placed precisely on the print bed. The material is deposited layer by layer, building up to the 3D structure.
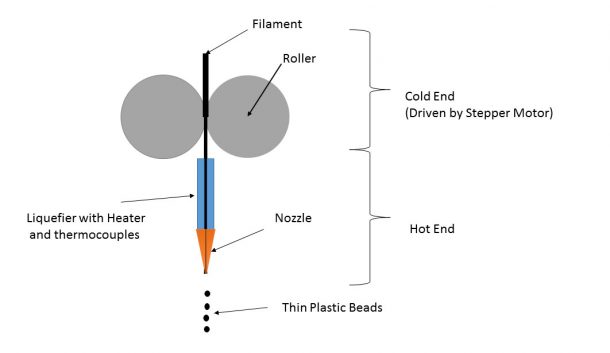
1. FDM 3D-Printer components
SLA is also an additive method, where 3D models are built up layer by layer. SLA uses a liquid curable photopolymer, typically a liquid resin, that is cured by UV light in laser form. The build platform lifts the model upwards out of the resin bath in SLA printers, and it is effectively printed upside-down.
Precision, Resolution and Cost – FDM printers typically use PLA, PETG or ABS filament. Most FDM printers can also handle some nylons, polyvinyl alcohol (PVA) and thermoplastic polyurethane (TPU). Filaments are available in various colours from various sources. SLA printers have a more limited pallet of resin materials, and often these cannot be exchanged between printers from different makers. The main difference between the two techniques is the precision and resolution of the prints. In FDM printers, the printer’s resolution is a factor of the nozzle size and the precision of the extruder movements (X/Y axis). Moreover, as the weight of upper layers may squeeze the layers below, several printing problems may occur, such as misalignment or shifting of layers. These compromise the precision and surface smoothness, which could be unsafe if the manufactured object is intended for medical usage, altering the accuracy of the design and being harmful when in contact with human tissue.
SLA printers consistently produce higher-resolution objects and are more accurate than FDM printers. SLA printers consistently produce higher-resolution objects and are more accurate than FDM printers. They use a laser beam to cure the resin, and the radius of that laser beam primarily determines the resolution of the print. This radius, called the spot size, is very small, hence resulting in high resolution. Moreover, during printing, less force is applied to the model. This way, the surface finish is much smoother, making SLA a better printing method to create the speculum since surface smoothness is vital for any device intended for medical use.
After printing on an FDM printer, support material around the object and excess plastic often need to be removed, either with fingers or a cutting tool. Sanding helps to smooth surfaces, but not to a medical standard. Models printed on an SLA printer are covered in sticky, leftover resin that has to be removed in a bath of isopropyl alcohol. Rubber gloves need to be worn during that process to protect your fingers from the resin and alcohol since they are irritating to the skin and the printing and post-processing need to take place in a fume cupboard since the materials are also irritating to the respiratory system. Depending on the model, supports may be required, which also need to be cut off, but they are easier to remove than from an FDM print, leaving a smoother finishing.
The consumables in FDM printers are nozzles and filament rolls. As mentioned, most FDM printers use the same standardized filament rolls and prices for filament have been declining in recent years. Nozzles do not tend to degrade quickly, are very cheap to replace on most models of printer and many even come with spares. In SLA printers, the bottom film on the resin tank has to be replaced after 2–3 litres of resin have been printed because the tank gets smudged over time, so the light source can no longer project the image precisely.
The conclusion is that SLA printing should be used when high precision and smooth finish are the priority, which is the case for any medical device that will come into contact with patients. However, SLA printing involves a higher cost and both methods require training and expertise to achieve a good quality result. The table below summarises a comparison of the two printing techniques I used in this investigation to print the GynePunk speculum.
| 3D Printing Method | FDM | SLA |
| 3D Printer Model | Anycubic i3 Mega | Anycubic Photon |
| 3D Printer Cost | £160 | £350 |
| Material | Polymaker PolyLite PLA | Anycubic 3D printer resin |
| Material Cost | £26/kg | £28/L |
| Slicing software | ||
| 65 % scale print | ||
| Printing time | 3 hrs 29 min | 12 hrs 11 min |
| Prep & post-processing time | 30 min | 20 min |
| Filament/resin amount | 19 g | 18.37 mL |
| Cost of material | £0.49 | £0.39 |
| 100 % scale print | ||
| Printing time | 10 hrs 1 min | 21 hrs 13 min |
| Prep & post-processing time | 30 min | 20 min |
| Filament/resin amount | 52 g | 56.89 mL |
| Cost of material | £1.35 | £1.21 |
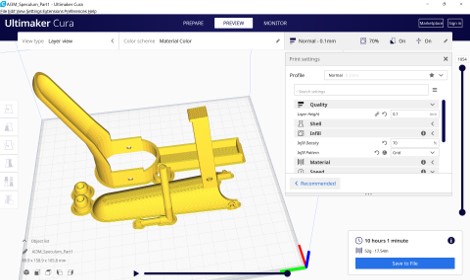
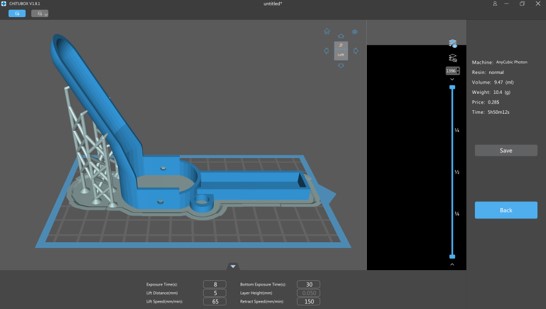
Before printing, slicer software must be used to prepare the digital models for the 3D printer. A 3D printing slicer converts the selected model to G-code – the most widely used computer numerical control (CNC) programming language – in a series of instructions the printer can understand. A common example of a slicer is Ultimaker Cura which can be downloaded for free and used with most FDM printers. For the SLA, we used Chitubox (also free to download) since SLA printers require specific slicers. The printing settings, such as the print quality and speed, can be controlled in the software, and the time and material required to complete a print are calculated. This means that not only does someone need access to a printer and materials to make the speculum, but they also need access to the internet to get the files and the software.
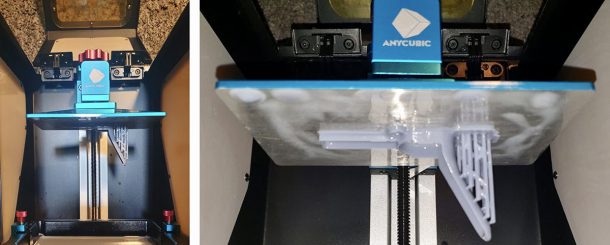
The SLA printer available in our laboratory (Anycubic Photon) has a small printing volume, limiting the size of the object that can be printed. For this study, I therefore printed the speculum at only 65 percent scale using the SLA technique (the FDM model was printed at 100 percent). Time and resource constraints relating to the SLA printer only allowed for the printing of the upper blade of the speculum during this project. Even though the materials used in this trial have approximately the same cost, the printers themselves differ in price, with the SLA printer costing almost twice that of the FDM.
2. Slicing Software 3D Print Preview
3. Before processing/cleaning of supports
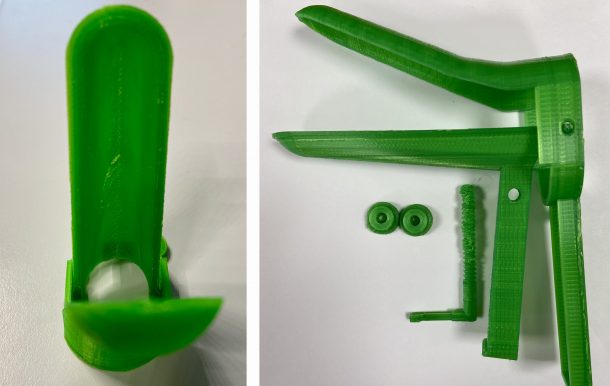
FDM 3D-printed speculum in PLA. 3D models acquired from the GynePunk speculum uploaded files on Thingiverse.
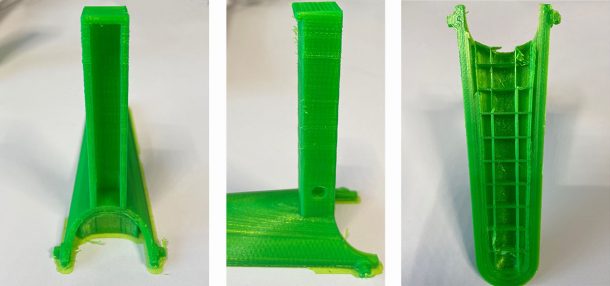
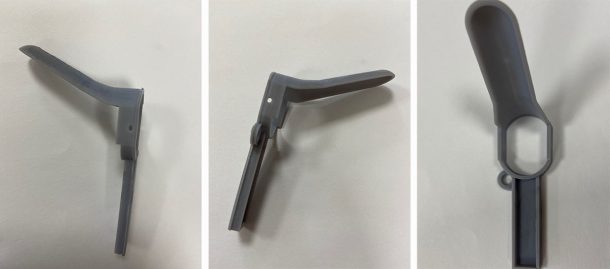
FDM printing always results in a printed part with excess plastic between any overhangs and the built plate, as well as a base below the print. That was the case when I printed the speculum design, which needed support material to be removed after printing (see images above). The prints also had some imperfections resulting in sharp edges on the surface. One of the printed parts, the speculum screw, failed during my first attempt to print it with the FDM printer, probably because the speed of the printer was not low enough for the precise printing of a small structure. (This demonstrates that even a very experienced user can have unsuccessful attempts with 3D printing, losing time and wasting material.) Even though the speculum design is open source and a 3D FDM printer can now be acquired relatively easily, it is still not possible to use it without any experience, especially to produce devices that could be harmful if not printed and post-processed very carefully (the sharp parts would cause injuries were the speculum to be used).
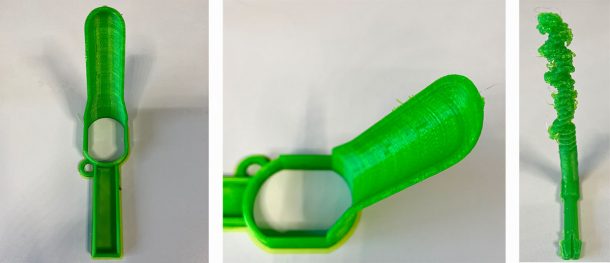
4. SLA 3D-Printed Speculum Upper Blade in Resin
SLA printing has the disadvantage of toxic resin fumes produced during the printing process. As mentioned, printing must take place in a fume cupboard or an appropriate enclosure with an extractor in a well-ventilated environment. This limits the accessibility of SLA printing, since it cannot be completed by any user in, say, their own home. The printed parts require minimum post-processing, however, with the supports being cut off quite easily without leaving a very rough surface at the site of attachment to the model. Even though more costly, the SLA speculum resulted in a better outcome with higher resolution and smoother surface, making it safer to use.
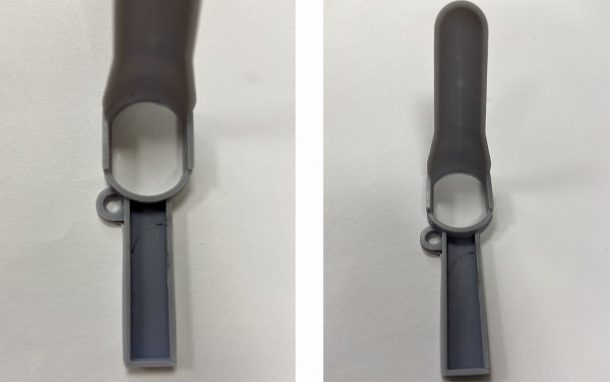
5. Post-processing, FDM-printed speculum assembled
6 Close-up of FDM print with 0.1 mm layer height

7. SLA-printed speculum upper blade, post-processing
SLA printing is far more time consuming than FDM. To print all parts of the GynePunk speculum at 65 percent scale would have taken 12 hours, 11 minutes using the SLA printer, whereas the FDM printer would take 3 hours, 29 minutes to print all parts at 65 percent scale. The efficiency of the printing method plays an important role in the manufacturing of medical devices, where long production times reduce accessibility and the speed at which one could access the tool.
8. Close-up of SLA print with 0.1 mm layer height
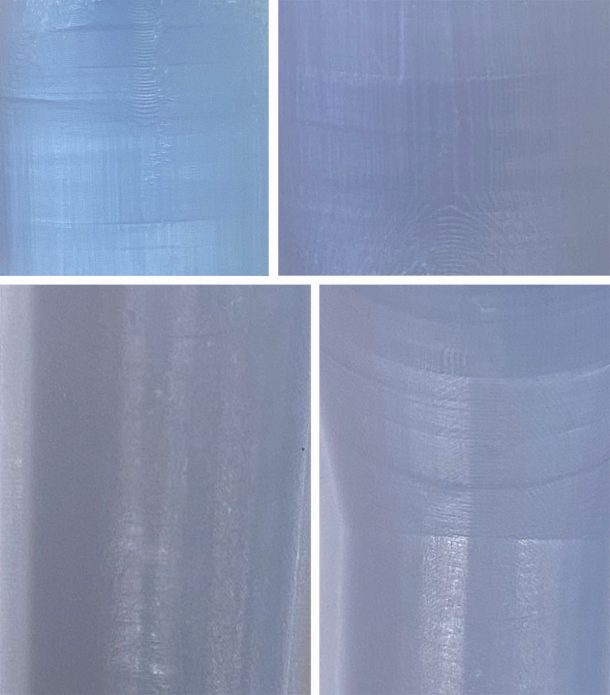
When comparing sections 6 and 8, a clear difference between the surface texture of the different prints is apparent. The layers of the FDM print are very apparent and quite thick, creating relatively large grooves between each layer and a rough finish. Here, the layers are still visible, but they are thinner and the surface appears smoother.
9. Microscope images of the FDM print, with 5x magnification
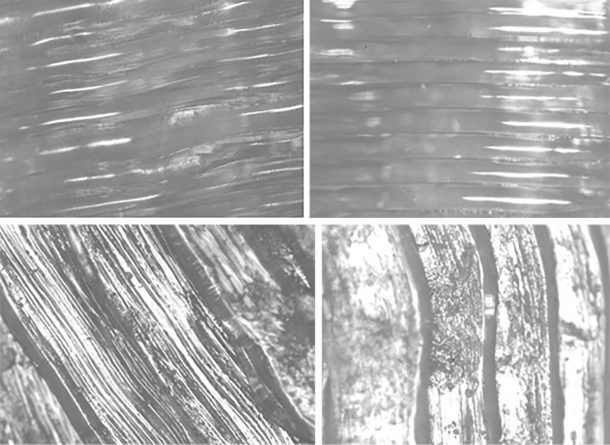
10. Microscope images of the SLA print, with 5x magnification
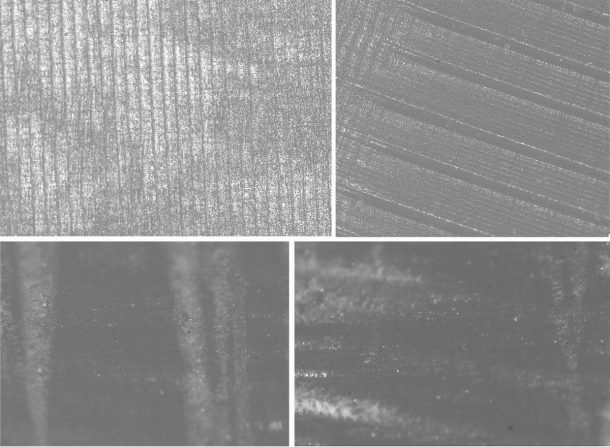
Looking at the above images (sections 6, 8–10), it is even more evident that access to a safe 3D-printed speculum could be more challenging than expected. Although the speculum design is open source and the FDM printing method, the one currently on display in the Design 1900 – Now galleries was low cost to produce and there are still difficulties with the printing process as well as safety issues. Under the microscope, the layers of the FDM prints are easily distinguishable. If this part was used for the examination of patients it could cause injuries to soft tissue. Moreover, if such printed parts are used more than once, bacteria could be trapped in the grooves and cause infection. Hence, the different materials and printing techniques make a big difference to the feasibility of using 3D printing to manufacture the speculum.
Can 3D printing be used to produce medical devices? Certainly! But it is not straightforward nor accessible to everyone. Manufacturing the GynePunk 3D-printed speculum for clinical usage would presently be prohibitively expensive, time-consuming and still have quality flaws, but it is nonetheless and important learning tool and fascinating piece of speculative design.