
Fabrics, patterns and stories
Ghanaian artist El Anatsui said that "cloth is to the African what monuments are to Westerners". He is saying that in many African cultures, from Kenya to Nigeria, fabric is as important as a big building or statue. It can tell stories, and mark moments of history.

Àdìrẹ fabric
These pictures show 'àdìrẹ' fabric which is historically made by the Yoruba of Western Nigeria.
This fabric is often indigo blue, as the dye is made from a plant called indigo. The patterns are particular to a local area – this way, when people see the cloth, they know where it was made and the story it tells.

This fabric was made in the town of Ibadan in South-Western Nigeria. The pattern is called Ibadandun which means 'Ibadan is good' in the local Yoruba language.
What shapes and patterns can you see in this fabric?

Can you spot any pictures of animals and birds? Can you see five pillars in some of the squares? These represent the pillars of the town hall in Ibadan.

How are àdìrẹ patterns made?
Historically, àdìrẹ cloth was mainly made by women, using techniques passed down from their mothers and grandmothers.

The patterns are produced using various methods which prevent the dye from reaching the cloth. When tied with raffia it is called àdìrẹ oniko.
The pictures and patterns we have been looking at were painted onto the fabric using a starch paste, this is often made from a root vegetable called cassava. This technique is called àdìrẹ eleko.
When the paste is dry, the fabric is dyed. The paste protects these areas from the dye, so when it is removed the patterns and pictures are magically revealed! The intensity of the colour depends on how many times it is dipped in the dye pot. The more times, the darker the colour.

Àdìrẹ fabric and fashion
Although the àdìrẹ technique is very old and reflects the traditions of the Yoruba, the fabric is used in fashion around the world and is often worn to celebrate Yoruba community and culture.

Ghanaian fashion designer Kofi Ansah was inspired by àdìrẹ in his designs. What would you design using àdìrẹ fabric?
Make a talking textile
Have a go at designing and making a fabric that says something about you, inspired by the àdìrę technique. Instead of cassava paste we will use a paste made from flour and water, and instead of indigo dye we can use fabric paint.
You will need:
- Pencil and paper or sketchbook
- White fabric
- Flour and water
- An icing bag
- Fabric paint (indigo or blue)
- A brush
Let’s make!
1. Sketch some ideas
Are there any pictures or patterns that say something about you? It could be a pattern on your favourite socks, a picture of your favourite person or place – or the shape of your pet hamster!
Mark out a set of four squares on some paper and draw your ideas in each (like the Ibadandan pattern). Keep the shapes simple so they are easy to re-create on your fabric.

2. Transfer your design onto the fabric
Once you are happy with your design, draw it onto your fabric with a pencil. Don't forget to mark out the outline of the boxes!
3. Mix your paste
Put around 4-heaped tablespoons of flour into a bowl and gradually add water until your paste is the consistency of thick custard.
Use an icing bag to pipe your designs.

Don't worry about any blobs or wiggly lines – this will just add to the interesting pattern of your fabric.
4. Wait for your paste to dry
This is the bit that requires patience! Your paste has to be completely dry before dyeing, so you may need to leave it overnight.
5. 'Dye' your fabric
When the paste is dry, brush on your fabric paint. Make sure that you paint right up to the edges of the dried paste lines.

6. Reveal your pattern!
When the paint is dry, pick off the dried paste to reveal your fabulous pattern!

Follow the instructions on your fabric paint for fixing the colour. Have a think about what you could make from your fabric. Perhaps a wall hanging? Where would you display your creation?
More talking textiles
Here is another cloth from Africa with a story to tell. It was made by the Ewe in Ghana. What patterns can you see?
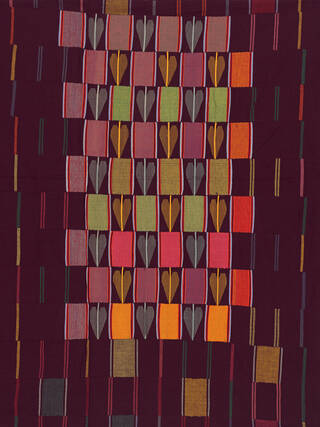
Ewe 'kente' cloth is made by stitching strips of woven fabric together and often includes a motif, or image. The motif can represent a proverb (meaning a piece of advice).
This cloth has a pattern of leaves that represent the Ewe proverb: 'I will not survive if I am plucked from the tree'.

Make your own kente inspired design
Have a go at weaving a design inspired by Ewe kente cloth, using strips of paper. Then add a motif to your weave that represents a proverb or story – or something important to you.
You will need:
- Coloured papers
- Pencil, scissors and ruler
- An idea for a motif
Let's make!
1. Make a paper loom
- Cut a square of paper that is 24cm x 24cm.
- Fold the paper in half and draw lines from the folded edge. The lines should be 3cm apart. Leave a 2cm border at the open end.
- Cut along the lines from the folded edge. Dont forget to leave the 2cm border!

2. Prepare your paper strips for weaving
Cut 9 strips of paper: 3 strips that are 3cm wide and 6 strips that are 1.5cm wide. The strips should be different colours.
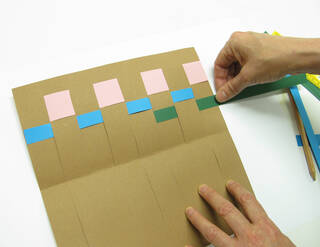
3. Weave your paper
Weave your paper strips through your paper loom. Trim off any long bits and glue the ends down.
4. Add your motifs
Cut and paste or draw your motifs onto your paper weave. This example was inspired by the proverb 'a bird in the hand is worth two in the bush' and has included shapes of birds and bushes.

Share your creations using #VAMFamilies.
Visit the V&A's Africa Fashion exhibition for more design inspiration.


