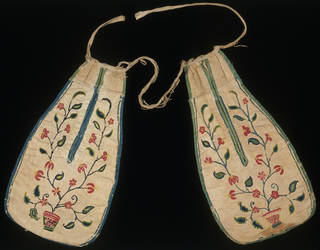
Popularised in the 17th century, tie-on pockets offered women a convenient and portable solution for storing their personal possessions and valuables, as well as everyday objects required for social situations, or when working. Concealed under petticoats or tied on the top of skirts, these spacious, versatile and highly functional accessories remained popular until the end of the 19th century.
Despite the decline in the use of tie-on pockets, women's clothing typically continued to be made either without pockets, featured decorative 'dummy' pockets, or had pockets so small that they were entirely useless – an issue still prevalent in contemporary fashion.
These instructions will guide you through the steps for making your own tie-on pockets. You can adapt them to your own choice of fabric, pattern and embellishment to suit your style and wardrobe.
Making your own pocket is very easy – just follow the simple instructions below.
1. Choose the shape
The first step is to decide what shape you want your pocket to be. The Workwoman's Guide of 1838 contains 'instructions to the inexperienced in cutting out and completing those articles of wearing apparel, &c., which are usually made at home' and shows us some of the traditional pocket shapes. The most common shape was a pear with a flat top, as seen in figure 11.
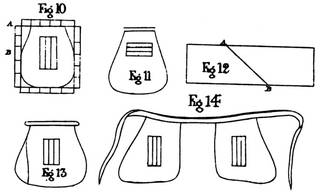
An easy way to make both sides of your pocket the same shape is to fold the piece of paper in half and draw half a pear-shape. If you want two pockets, then cut four pieces (two backs and two fronts) from the same pattern. Surviving pockets show us that many were not perfectly symmetrical in shape, so you can draw them freehand if you want. You could even invent a completely new shape of pocket!
Follow these five simple steps to make your pocket template:
- Find a plain piece of paper.
- Fold the piece of paper in half.
- Draw half a pear shape with a flat top.
- Keeping the paper folded, cut out along the lines you have drawn.
- Open paper to reveal symmetrical pocket shape.
2. Choose the fabric
Traditionally, linen was used for pockets, but in the 19th century, cotton became more common. Both fabrics were easily washed, which was helpful when carrying potentially messy items such as pens or fruit! For fancier pockets, silk was a popular option and was either plain or decorated.
You don't have to buy new material to make your pockets – many were made using fabric from old clothes and textiles. You could repurpose unloved clothing, bed linen or even tea towels to make your new pockets! The fabric itself could be plain or patterned.
3. Choose the decoration
Depending on your choice of fabric – and what you'll be wearing your pockets with – you might want to add some surface decoration. Embroidery, beadwork and ribbon trimming were popular choices for embellishing pockets.
Embroidery was typically done before the pocket shape was cut out. The fabric was sewn onto a wooden frame to hold it taut, making the embroidery easier to do. You could try using an embroidery hoop from a needlework or craft shop to hold the fabric tight. Pockets from the 18th century used either silk or wool thread for embroidery. Yellow thread was very popular, as were red, green and blue. Commonly used embroidery stitches were backstitch, outline stitch and chainstitch but you can use any colour or type of thread you like, in any stitch you fancy.
Most pocket backs are completely plain. After all, no one is going to see them!
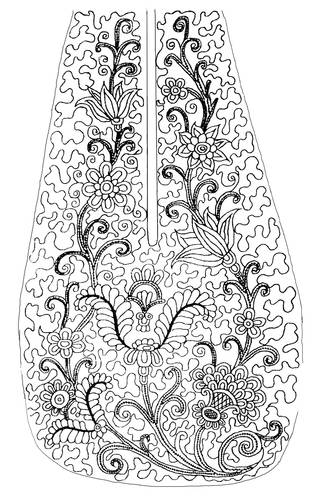
If you need some design inspiration, why not have a look through the pockets in our collections? Alternatively, you can download our pattern template, adapted from an unfinished linen pocket design from about 1718 – 20.
Simply follow the instructions below:
- Print out the pattern for the pocket in black and white.
- On a photocopier, enlarge the printed pattern by 193% to end up with a pattern the same size as the original.
- Trace the pattern and shape of the pocket onto tracing paper.
- Place the tracing paper onto your fabric and secure in place.
4. Sew it together
Follow these final steps to complete your pocket:
- When the embroidery is finished, cut out the pocket shape, leaving about 1cm around the outside of the shape itself to allow for hemming.
- Carefully cut the opening in the front of the pocket.
- Place the wrong sides of the back and the front of the pocket together and sew about 5mm from the outside edge. You can hand sew with running stitch or backstitch, or use a sewing machine.
- To cover the raw edges, use a ribbon or linen tape which is wide enough to cover the stitching. Don't forget to bind the raw edges of the front opening as well.
- Lastly, sew on a piece of ribbon or linen tape, long enough to go around your waist, plus some extra for tying.
