Below we explain some of the techniques used to make objects in the museum’s collections.
If you'd like to view objects from our collections up close and in-person, explore our Order an Object service.
Forming
Forging
Most metals can be manipulated by heating and then hammering them into shape, either by hand or with machinery. Forging tends to refer to larger-scale, hard metals like iron and steel. There are varieties of forging techniques according to the materials being worked and the products being created. Forging is traditionally used by blacksmiths, armourers, cutlers (someone who makes cutting implements and cutlery) and swordsmiths hammering by hand, but since the Industrial Revolution has also been used in large-scale factories using drop hammers and presses.
Casting
Casting involves pouring molten metal into a mould where it cools and solidifies. Bronze and iron moulds were lined with egg white and jeweller’s rouge (ferric oxide) to prevent the metal sticking. On removal, the excess metal that set in the pouring channel would be cut away and the object polished. Traditionally, metalworkers like brasiers (works with brass), silversmiths and pewterers required a collection of moulds so that they could cast objects in sections and then trim and assemble them.
Lost-wax casting
One of the oldest and most commonly used casting methods is lost-wax casting. Wax is carved into the desired shape or coated onto a basic pattern and a mould of plaster or loam (sandy soil) is formed around the wax. The mould is then fired, or allowed to set, and the wax is melted out. Molten metal is then poured into the cavity left by the wax. The mould is then broken open to reveal the cast piece. Each mould can only be used once, which gave rise to the saying ‘to break the mould’ when referring to something with unique qualities.
Sand casting
Developments in sand casting during the 17th century were a key element of the Industrial Revolution. A pattern made from a material such as wood (or later, plastic) is pushed into a multi-part container filled with damp sand. The pattern is then removed to reveal a cavity. Narrow channels are then created to allow the metal to flow in and gas to flow out. The mould is then closed and molten metal is poured in. On cooling, the hardened casting is removed from the sand and trimmed ready for assembly. Sand casting sometimes leaves a granulated surface on the undersides of objects where the casting has reproduced the sandy surface of the mould.
Open casting

Casting in open sand moulds predates the industrial sand casting of the 18th century. Cast iron firebacks were made from the 16th century by pouring molten iron into open-faced moulds of sand or stone. The front is an exact replica of the mould whereas the back, during casting, is open to the air and is therefore a rough, negative version of the front. Foundries in the Kent and Sussex Weald in England were major producers of cast iron firebacks.
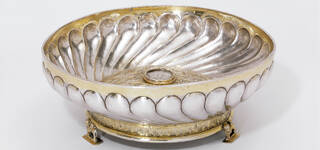
Raising
Raising involves shaping flat sheets of metal into three-dimensional forms by heating and hammering the metal over a solid surface. Raising can be done on an anvil or over shaped stakes of different sizes. Decoration can then be added using other techniques like embossing and chasing.
Die stamping
The development of steam-powered rollers during the 18th century enabled the production of sheet metal so thin it could be stamped into bold shapes under pressure. At the same time, the industrialist Benjamin Huntsman’s commercial development of crucible steel, in which impurities in the steel were skimmed on melting, created hard, consistent steel that enabled the production of very heavy steel dies (moulds). Metal sheet was placed between the two dies, which formed the positive and a negative of the shape required, and a drop-hammer applied rapid pressure to replicate the shape of the die. The resulting stamped objects are much lighter than cast objects as they require less metal.
Roll stamping
In around 1755, Johann Heinrich Giese, a coppersmith from Iserlohn in western Germany, a town still known for its metal industries, developed a stamping mechanism that rolled patterns onto brass. The pattern was engraved into the roller and as sheets of brass were passed through it under pressure, the pattern was pressed onto the brass multiple times in a row. The sheets were then cut up for assembly, mostly as tobacco boxes.
Spinning
During the 1840s, high speed lathes were developed that enabled sheet metal to be spun into shape. A stake or mandrel is fixed to the lathe and when it is spinning fast enough, a flat disc of metal can be pressed against it and with considerable skill, formed into consistent rounded forms.
Electroforming

Using an electric current, metal can be deposited from a solution into a mould with a huge degree of accuracy. The mould is first lined with graphite or a metal paint to make it conductive. It is then placed in a tank on a positive electrical charge. When the current is switched on, the metal in the solution, such as copper sulphate or silver cyanide, is attracted to the mould. Once the coating is the desired thickness, the mould is removed, and a perfect metal impression of the mould is left. This technique was invented in the mid-19th century and the V&A took advantage of it to create thousands of accurate copies of historic and modern objects to provide models for artists and designers to study.
Assembling
Soldering
Soldering is used to join two metal surfaces by melting a softer metal between them and allowing it to set. This technique is used in conjunction with many others and is often part of the process of creating a metal object. Historically, lead, tin and silver solders were used for fixing handles, finials and feet to objects like teapots and tankards.
Direct casting
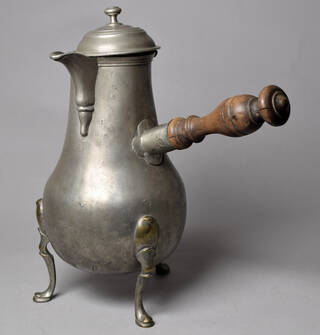
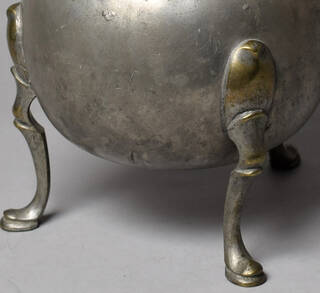
Opening the lids of tankards and flagons made with a soft metal like pewter sometimes reveals an imprint where the top of the handle joins the body. Pewter (primarily made of tin) has a low melting point, meaning that handles can be attached directly by casting them onto the body, rather than soldering them. Pressing a small pouch of linen filled with damp sand on one side cools the metal and prevents a hole burning through while the hot casting is applied to the other side. Immortalised in the process is the pewterer’s thumbprint, pressed onto the metal through the linen.
Plating/coating
Gold leaf
A thin layer of gold leaf can be applied to the surface of a different metal to create the look of gold. This is a delicate process as the gold leaf is extremely fragile. The surface of the metal to be gilded is covered in a glue, today called ‘gilding size’ and allowed to become tacky. Gold leaf is then adhered to the surface one leaf at a time before being burnished or polished down and then sealed. Gold leaf can be used to entirely gild an object or just gild some surfaces (parcel gilt).
Mercury gilding
Mercury gilding or ‘fire gilding’ is an extremely dangerous process that is now forbidden, except in extremely controlled circumstances. Gold powder is mixed into a paste with liquid mercury and painted onto the surface of an object. The mercury is then burned off sending lethal fumes into the air. The process fuses the gold to the underlying metal. Mercury gilding was used for centuries to decorate silver, picture frames, armour and bronze. The mercury gilders at the Royal Armoury in Greenwich during the 16th century had to work in a separate workshop and, despite the health hazards, were paid less than their colleagues.
Bluing
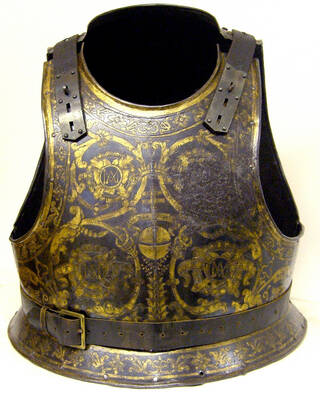
Bluing is a heat treatment that applies multiple layers of oxidation to protect and enhance the appearance of steel. As steel is heated, it first turns a dark iridescent blue and then purple and then light blue according to the temperature of the flame and its proximity to the steel. Bluing protects against rust. Historically, bluing was a technique used by armourers and bladesmiths who mostly kept their working practices a secret, but it is likely it took place inside a kiln to ensure an even all-round temperature. Blued steel is often used in conjunction with other metals, such as gold, in order to enhance the contrast in colour. Heating steel changes its hardness, so the final processes when decorating armour of tempering, bluing and mercury gilding were all done simultaneously.
Fused plate (Sheffield plate)
Fused plate is more commonly known as Sheffield Plate as the technique was developed in Sheffield, England, by the cutler (someone who makes cutting implements and cutlery) Thomas Boulsover in around 1742. A thin veneer of silver is fused to a thicker block of copper using heat. The block is then run through a series of heavy steel rollers to flatten it into sheet. The softer silver expands with the copper to create a sheet of plated copper that can then be hammered or stamped into shape. Fused plate cost about six times less than silver in the 18th century, although the market was still largely wealthy. It was a popular alternative to silver until the introduction of electroplating in the 1840s.
French plating
Brass and copper coated with a thin layer of silver offered a cheaper, convincing alternative to sterling silver. The finished brass object is scored with diagonal grooves to provide a ‘keying’ for silver leaf to be rubbed, hammered and heated onto the surface. As many as five or six layers of silver foil need to be applied to obtain a convincing veneer. Despite the lengthy manufacturing process, silvered brass was considerably cheaper than equivalent pieces in silver. Metals like silver and brass were expensive but the effort was worth it as labour was cheap. It was common for wealthy families to supplement their silver with plated goods to create a more spectacular buffet. A dealer, advertising in the Daily Journal in 1731, warned of ‘the Excessive Deceipt of Whited Brass sold only by braziers and by them called French Plate’.
Close plating
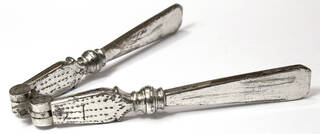
Close plating was a method used particularly by the cutlery industry to apply a silver surface to a base metal of iron or steel. Steel nutcrackers or knife handles were immersed in a flux of sal ammoniac (ammonium chloride – a powerful acid used to clean metal surfaces, particularly for soldering, tinning, and brazing), dipped in molten tin and covered in a thin silver foil. A hot soldering iron was applied to the surface, melting the tin under the silver foil and fusing the silver to the steel.
As close-plate ages, bubbles of rust on the substrate cause the plating to lift in patches. On exposure to the air, the sandwiched layer of tin tarnishes and turns black.
The silversmith Richard Ellis patented close plating in 1779, but the technique was much older. Manufacturing close plate was laborious and time consuming, but the industry did not impact directly with electroplate in the same way as Sheffield plate. Close plate workers specialised in making cutlery, scissors, and candle snuffers up until the early 20th century.
Tinning
Tinning is fusing a thin layer of tin to another metal to give it the appearance of a white metal. It was often used on pans and hot water urns during the 18th century to protect food and drink from the harmful effects of copper. Occasionally, it was applied to strong brass fixtures on pewter items to give a uniform white appearance. As brass was more expensive than pewter, this was a deliberate aesthetic choice to make it look like the cheaper metal.
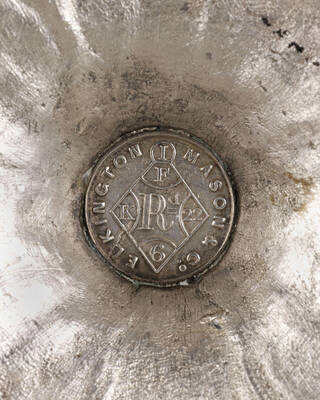
Electroplating
Electricity revolutionised the trade of coating base metal objects with silver. Patented by Elkington and Co. of Birmingham in the 1840s, this technique quickly superseded traditional techniques like French plating and Sheffield Plate. A negatively charged silver bar, suspended in a vat of potassium cyanide, deposits a coating of silver on a positively charged base metal object (typically copper, later nickel-silver) that is immersed with it. Electroplated objects were fully formed in base metal before plating. Electrogilding is a similar process using gold.
Anodizing
Anodizing is a similar process to electroplating in which a metal object, usually aluminium but sometimes magnesium or titanium, is coated with a corrosion-resistant finish, often in bright colours. The aluminium object becomes the ‘anode’ (positive electrode) in a vat containing an electrolytic solution, such as sulphuric acid. When the current is switched on, the aluminium surface s coated with oxides from the solution. Anodizing was first used on a commercial scale in the 1920s for coating parts of seaplanes to protect them from rust.
Decorating
Embossing
Embossing is a technique for manipulating metal into bold forms, sometimes freehand, using small hammers and sometimes shaped dies. Also known as repoussé, embossing is carried out from the reverse to create areas of high relief and from the front to sink areas of low relief. It is usually combined with finer techniques such as chasing and engraving.
Chasing
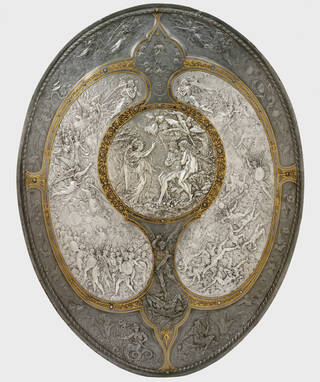
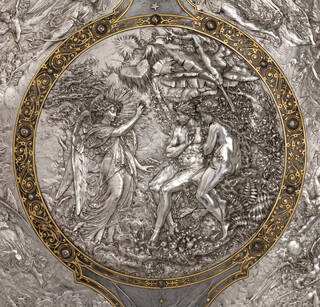
Chasing is the technique of using fine tools of varying sizes to lightly hammer and press a metal surface to add intricate detail to objects. Unlike engraving, chasing does not remove any metal in the process – the metal is worked from the front by repeatedly tapping the surface. Sculpting a soft metal like silver requires extremely high skill levels, while manipulating hard steel for chased armour requires breathtaking artistry.
Silversmith, Charlie Lewis, demonstrates the technique of chasing on a sheet of silver that has been previously embossed on the reverse.
Chiselling
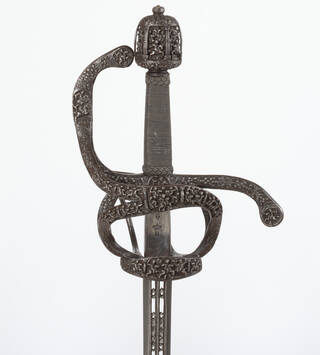
Using a selection of tiny hammers and chisels to gouge, carve, drill, and scrape away hard steel requires virtuoso craftsmanship. Renaissance steel chisellers were specialists who decorated iron and steel sword hilts, jewellery, furniture and caskets.
Etching
Etching involves using corrosive acids to bite designs into hard metals like iron and steel, which are difficult to engrave. The metal is covered in a material that will resist the corrosive effects of the acid, such as beeswax. An image is then drawn into this layer with a sharp tool, revealing areas of the metal layer underneath. The object is then coated in acid, which eats away at the exposed metal. The background can either be dissolved away so the design stands out in relief, or the design itself can be bitten into the surface in the manner of intaglio engraving. Etching creates a shallow relief, making it possible to create highly decorated objects without compromising the structural integrity of the metal. The effect can be exaggerated using gold and coloured lacquers.
Engraving
Engraving involves incising (carving or cutting) fine lines, cross-hatching and lettering onto a metal surface to create patterns, images or texts. It is highly skilled work and engravers in pre-industrial workshops were paid more than other workers. It is also a high-risk process because it involves removing metal from the surface. As it is performed in the final stages of object production, mistakes can be costly. Traditionally, hand tools called gravers and burins were used, but nowadays, for a mechanical finish, electronic tools and laser cutting offer a consistent alternative.
Wrigglework
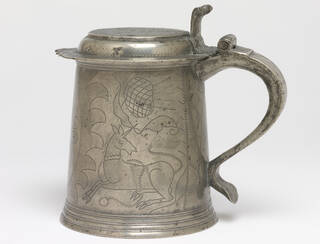
Wrigglework is a form of engraving that appears predominantly on pewter and occasionally silver. It is a freehand technique in which a sharp, flat-edged tool is worked in a zigzag motion on the metal to creates jagged lines. Wrigglework was fashionable in England and the Netherlands between 1660 and 1730. It mostly depicts flowers, birds and animals in the spirit of late 17th-century needlework and Delftware. Similarities in design suggest that engravers used established patterns. No two designs are identical, however, as they were applied freehand. Customers in shops or at fairs most likely bought blank tankards and chose their decoration, which was added on the spot by jobbing engravers.
You can briefly see wrigglework in action in this film.
Bright cutting
This is an engraving process in which sharp, angled gravers are used to nick triangular-section dents into the surface of objects to create a bright, reflective surface that catches the light. The technique was particularly popular during the late 18th century for decorating tea and coffee sets, bottle tickets and snuffboxes in silver, copper, pewter and Britannia Metal (pale pewter alloy).
Engine turning
From the late 18th century, mechanical production had an aura of its own and was prized for its modernity. Engine turning required a mechanical engraver to cut extremely accurate and consistent repetitive lines and geometric patterns onto metal objects like snuffboxes and watch cases. Sometimes the pattern was left as the final surface decoration. At others it formed the base for rich, transparent enamelling to give extraordinary depth and an attractive shimmering effect.
Piercing
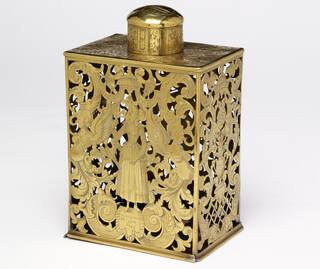
Piercing is the effect of having holes in the surface of a metal to create a sense of lightness or reveal another material beneath. The holes may be punched or drilled in rows but for more intricate shapes you need a wire saw. The desired pattern is first traced on the surface. Then a small hole is drilled through the centre of the piece to be removed. Wire is fed through and joined at both ends to create a small fret saw. Each hole is then sawn out individually in a painstaking and highly skilled process.
Fly pressing
Fly presses were industrial hammers first used in the 1760s by the makers of Sheffield Plate. They could not pierce their products the traditional ways as sawing holes in silver plated copper would reveal the copper beneath. A fly-press takes advantage of the softness of the silver plating by punching holes mechanically through the metal which, in the process, drags the soft silver surface through the hole with the punch, covering up the copper substrate as it goes. Early fly presses consisted of individual punches but later ones could apply a whole range of pierced ornament in one go.
Punching
Long before mechanical die stamping, metalworkers punched and stamped small-scale repetitive decoration by hand into brass, pewter and silver using raised or sunken dies. Specialist basin-beaters in Nuremberg and other European centres of brass production worked in a tightly controlled trade where the punches and stamps they used were registered to them by the local trade councils. The basin beaters’ workshops could be quite large and even in the late 16th century, their products may go through up to seven separate workstations before the final punched and stamped decoration was applied.
Cut steel
Cutting and faceting steel was a technique developed in small workshops, particularly centred on Woodstock in Oxfordshire, England. Steelworkers with shops facing the market place sold luxury jewellery, swords, buckles and chatelaines (decorative hooked clasp that hung from the waist from which functional objects such as scissors and keys were attached) decorated with steel studs shaped like diamonds to diplomats leaving Blenheim Palace. Melting down discarded nails from horseshoes, the steel workers hammered at the edges of the studs so that they caught the light. Every stud was fitted with a screw thread so that it could be unscrewed and cleaned to prevent rust. Cut steel looked like diamonds and could cost almost as much.
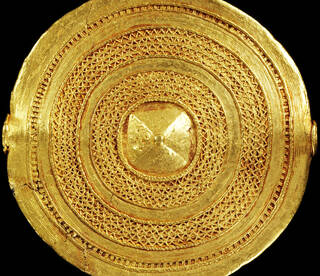
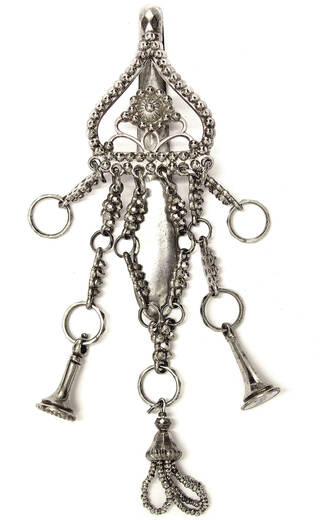
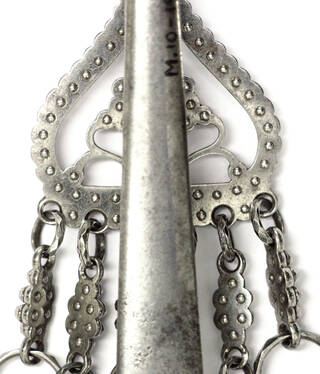
Filigree
Filigree is painstaking work involving twisting metal wire into intricate openwork patterns which are either attached to a metal support, or constructed solidly enough to be self-supporting. The wire is sometimes attached to a metal base that acts as a backing. The process has a long history. The term ‘filigree’ comes from the Latin ‘filum’ meaning ‘thread’ and ‘granum’ meaning ‘grains’ or ‘beads’. It was first developed in ancient Egypt and Mesopotamia (now Iraq, north-east Syria and part of south-east Turkey) and then spread through Asia and the Roman Empire. Since the medieval period, it has mostly been used for small-scale jewellery.
Damascening (inlaying)
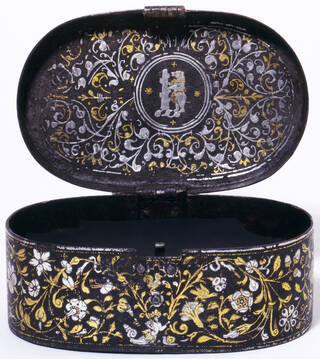
A variety of methods for ornamenting iron, steel and brass with silver and gold wire developed in China, Japan and the Middle East before being adopted in Renaissance Europe where they were termed ‘damascened’ or ‘damask’ work, after Damascus in Syria. Pure damascening involves engraving channels into iron, steel or brass that are filled with gold wire and then polished down to create a flat surface. In Europe it was more common for the iron surface to be scored with lines to provide a bed onto which gold wire or gold leaf was hammered. In the 19th century, there was a revival in damascening that was showcased at international exhibitions. By this time, the term damascening often referred more to an appearance than a technique.
Keum-boo

Keum-boo is a Korean jewellery technique that translates literally as ‘attached gold’. It involves decorating one metal, such as silver, with thin sheets or strips of gold by heating them to fuse them together. The fusion creates rich and varied textures.
Granulation
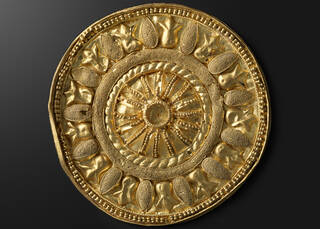
Granulation involves fusing tiny grains of gold or other metals to an object to enhance the decorative scheme. It is a rare technique, partly as the granulations are so fragile. Historically, it was particularly associated with Etruscan (ancient Italian civilisation) jewellers from between 700 and 400 BCE.
Preparation for enamelling
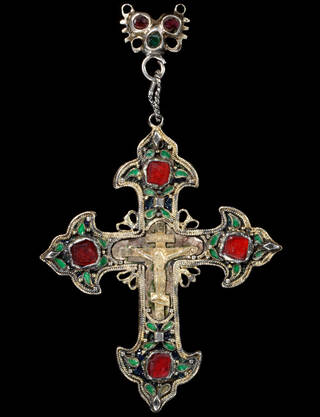
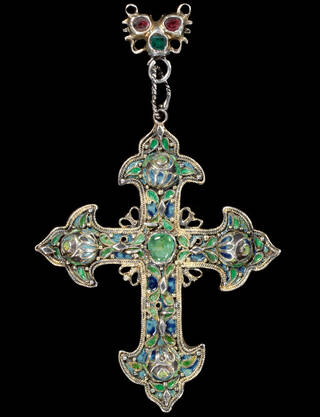
Champlévé enamelling

Champlevé, literally meaning ‘raised field’, is a form of enamelling where cells or sunken fields are formed by carving or etching recesses into the surface. Different coloured enamels are then fired inside the fields to add brightly varied decoration to metals. The joins between the fields and the unrecessed areas in the background also become part of the decoration and are often gilded to create sharp outlines and backdrops for the overall decorative scheme.
During the 17th century, a single London workshop belonging to Anthony Hatch and Stephen Pilcherd created enamelled brasswares in which the fields were added into the same moulds that the brass objects were cast. When the brasswares were removed from the moulds, the fields were already formed.
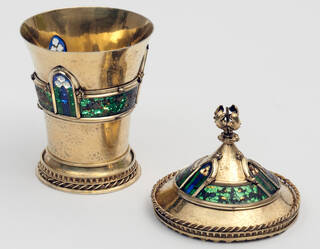
Cloisonné enamelling
Cloisonné, from the French cloisons or partitions, involves fixing very fine silver or gold wire to the surface of a metal object to create defined sections into which different coloured enamels will be fired. The wire is initially glued to the surface before it is then fired, fusing it to the object and melting away the glue. The wires are not merely functional. They form an essential part of the decoration, creating sharp outlines for the various colours.
Plique-à-jour (translucent enamelling)
Plique-à-jour is technically the most demanding enamelling technique because it involves firing the glass into cells and then removing the backing, to create a translucent effect. Light can shine straight through the enamels, giving a different glow according to the strength of the light and time of day. Plique-à-jour loosely translates from French as ‘letting in daylight’. On a small silver or gold cup, it creates an effect like a miniature stained glass window.
Discover more about enamel in our collections.